Getting started
Introduction
Our web application serves as a platform for renting virtual assets, providing individuals and businesses with a flexible solution to access digital resources without full ownership. Through this innovative platform, users can conveniently lease virtual assets for a variety of purpose
Access our website via: https://www.vpsets.com
Signup:
To Sign Up, follow these steps:
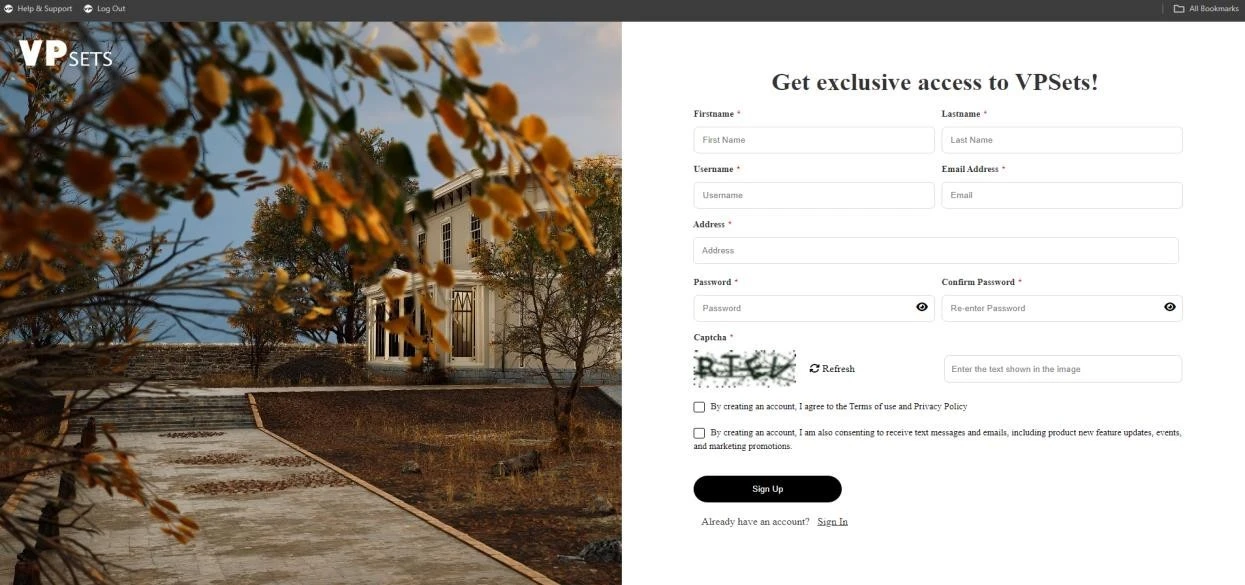
To create a new profile, please go to the Sign In page and select the "Sign Up" option. This will guide you through the process of creating a new account.
Complete the registration form by providing all the required information, including your full name, valid email address, and a strong password that meets security requirements. Re-enter the password to confirm it, and include your residential address details if required.
Be sure to click the checkbox to agree to the following terms:
By creating an account, you agree to the Terms of Use and Privacy Policy.
By creating an account, you also consent to receive text messages and emails, including updates on new features, events, and marketing promotions(optional).
You can review the Terms of Use and Privacy Policy by visiting the "Terms of Services" page available in the footer of the website. Once you have filled out all required fields and agreed to the terms, click the "Sign Up" button to create your new account. After successfully logging in, you can use your username and password for future logins.
Once you’ve entered all required information and clicked "Sign Up," you'll be automatically redirected to the “Verification” page. Here, you'll need to enter the OTP (One-Time Password) sent to your registered email address. This step ensures your email is valid and helps secure your account. If you don’t receive the OTP within a few minutes, check your spam folder or request a new one.
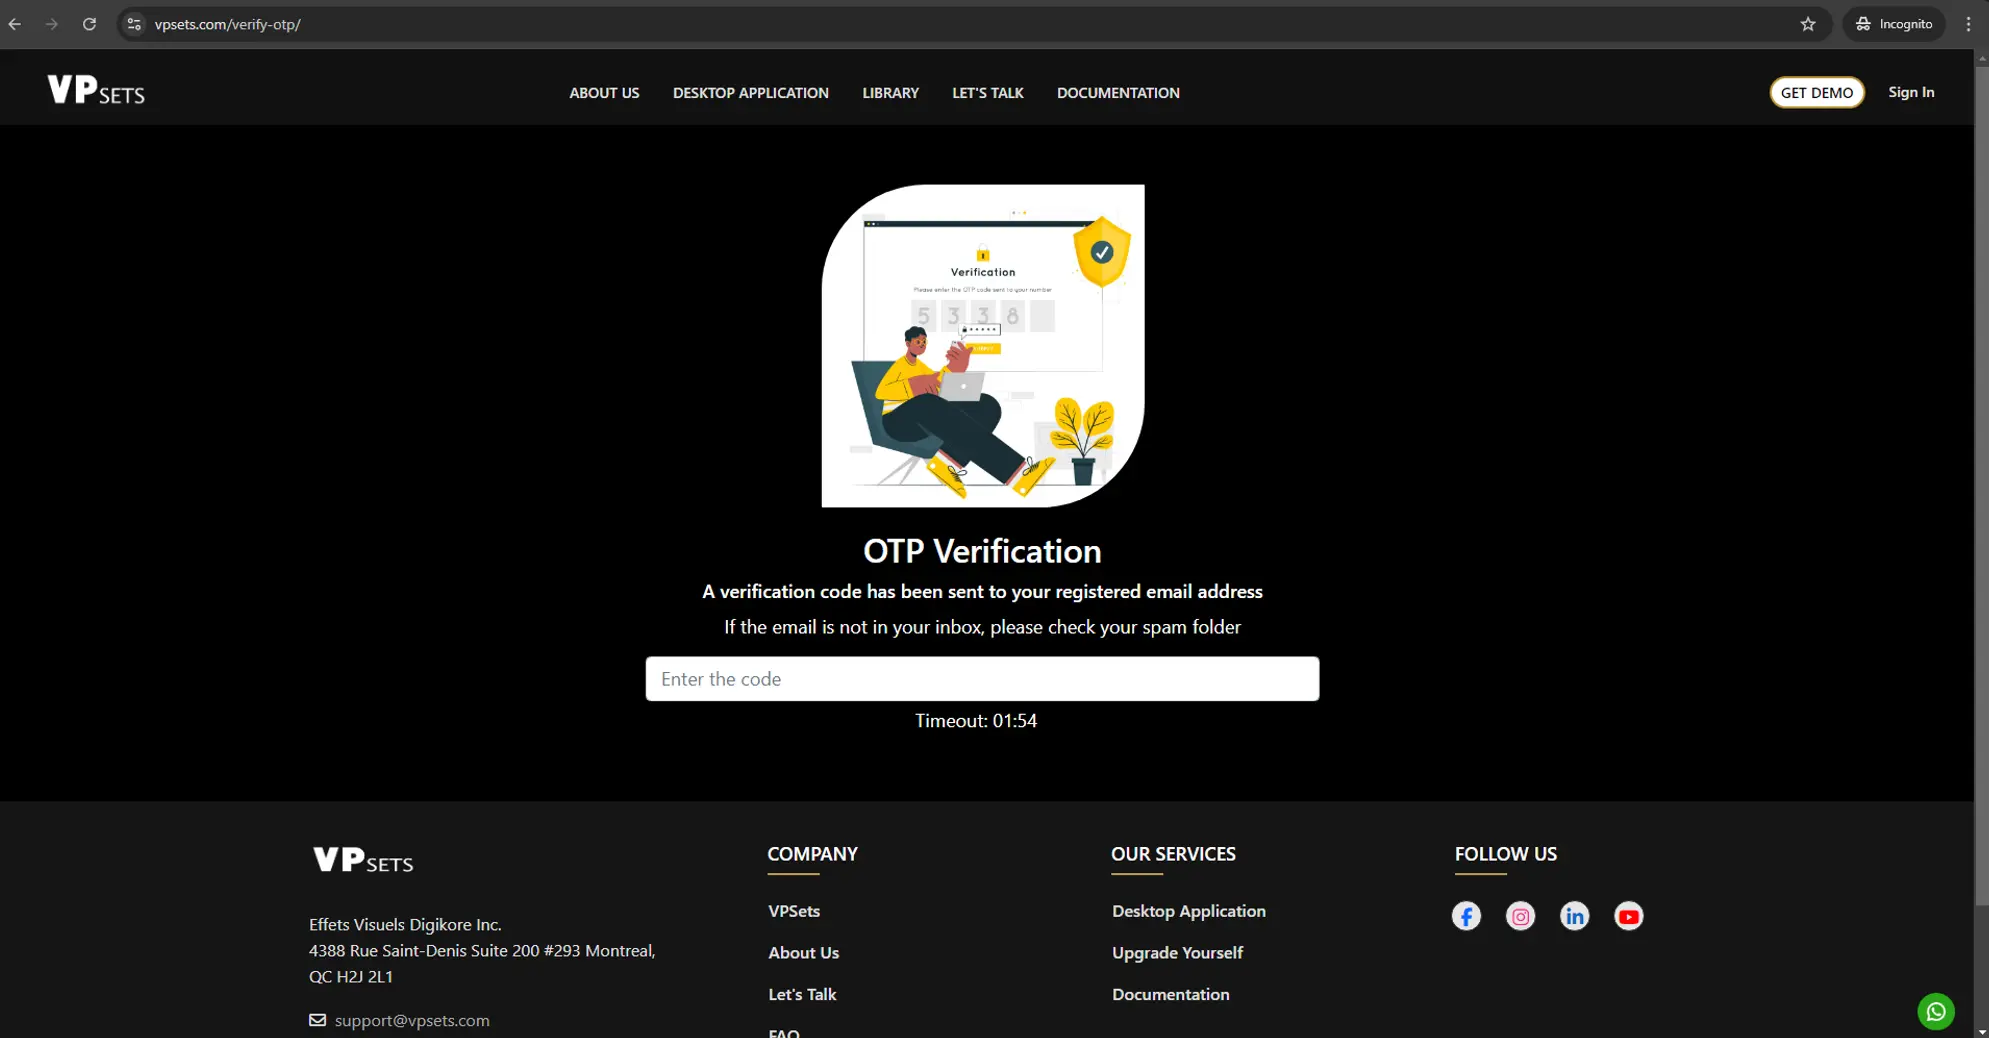
Once validated, you’ll be able to log in and browse the website’s content seamlessly, including all available features and resources. If you encounter any issues, please check your email settings or contact support for assistance.
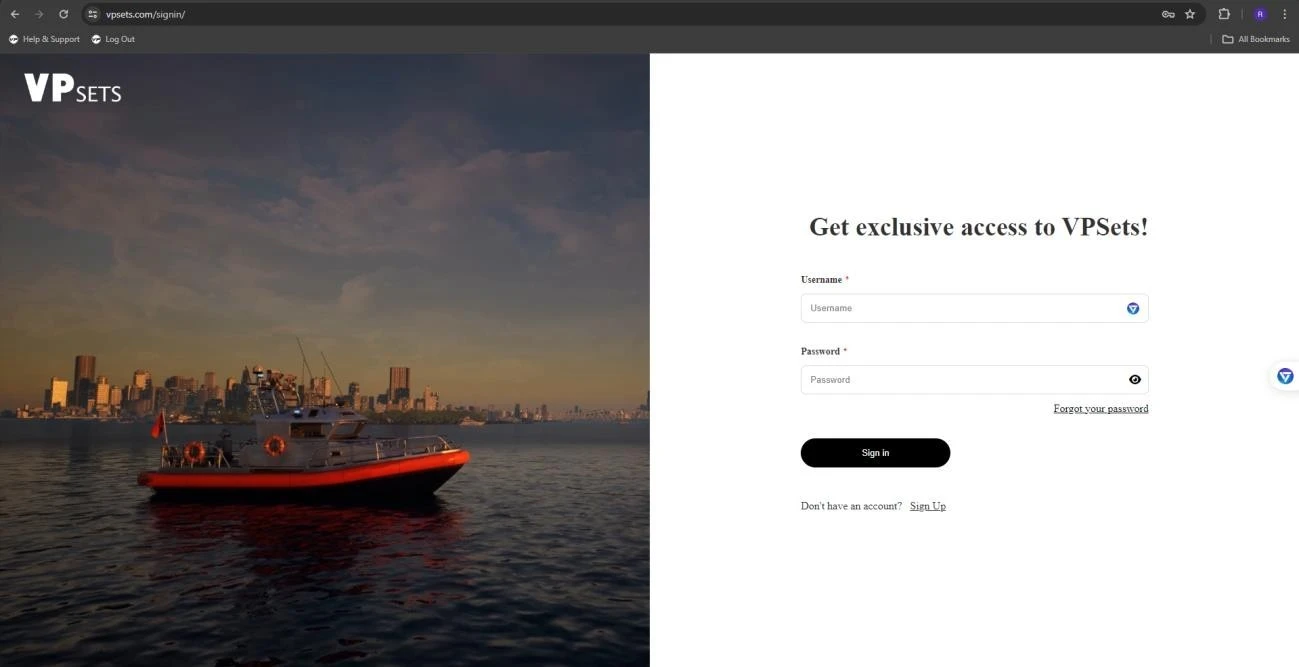
Sign in:
To sign in, follow these steps:
If you were previously logged in, you can seamlessly browse our website and explore its content. If you are not currently signed in, simply click on the "Sign In" option in the navigation bar to be redirected to the login page.

If you’re an existing user, input your "Username" and "Password" into the respective fields on the login page. After entering your credentials, click the "Sign in" button. Upon successful authentication, you will be redirected to the assets library page, where you can access and manage your files and resources.
If you’re a new user, click "Sign Up" to begin the registration process. Follow the prompts to create your account, and once registration is complete, you will be able to log in with your new credentials.
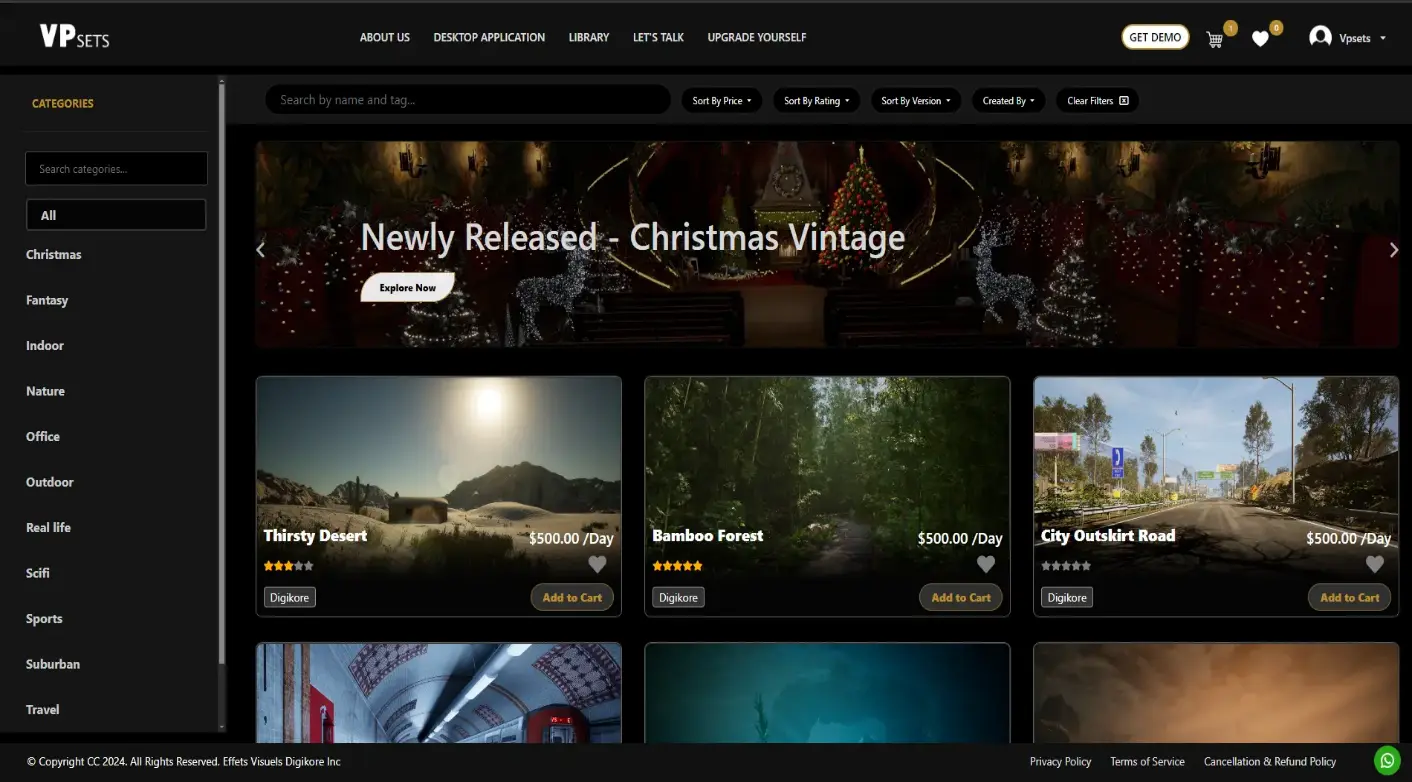
Browsing the Asset Library:
To navigate the asset library, start by clicking on the "Library" page, which will direct you to the asset browsing area. On the left side of the library page, you’ll notice a sidebar that features various asset categories. To find the assets you need, simply select the relevant categories from this sidebar. Once you’ve chosen a category, the library page will update to show all the available assets within that selection. From here, you can view more detailed information about any asset by redirecting to the “Product Details” page.
To efficiently find assets in the library, utilize the filter functionality available. You can refine your search by applying various filters.
Filter by Rating: Select the desired rating range from the options provided to view assets based on their ratings.
Filter by Price: Choose to sort assets from high to low price to find options within your budget.
Filter by Version: Apply the version filter to view assets based on their version to ensure compatibility.
Clear All Filters: Use the option to clear all applied filters to reset the asset listings and view all available assets.
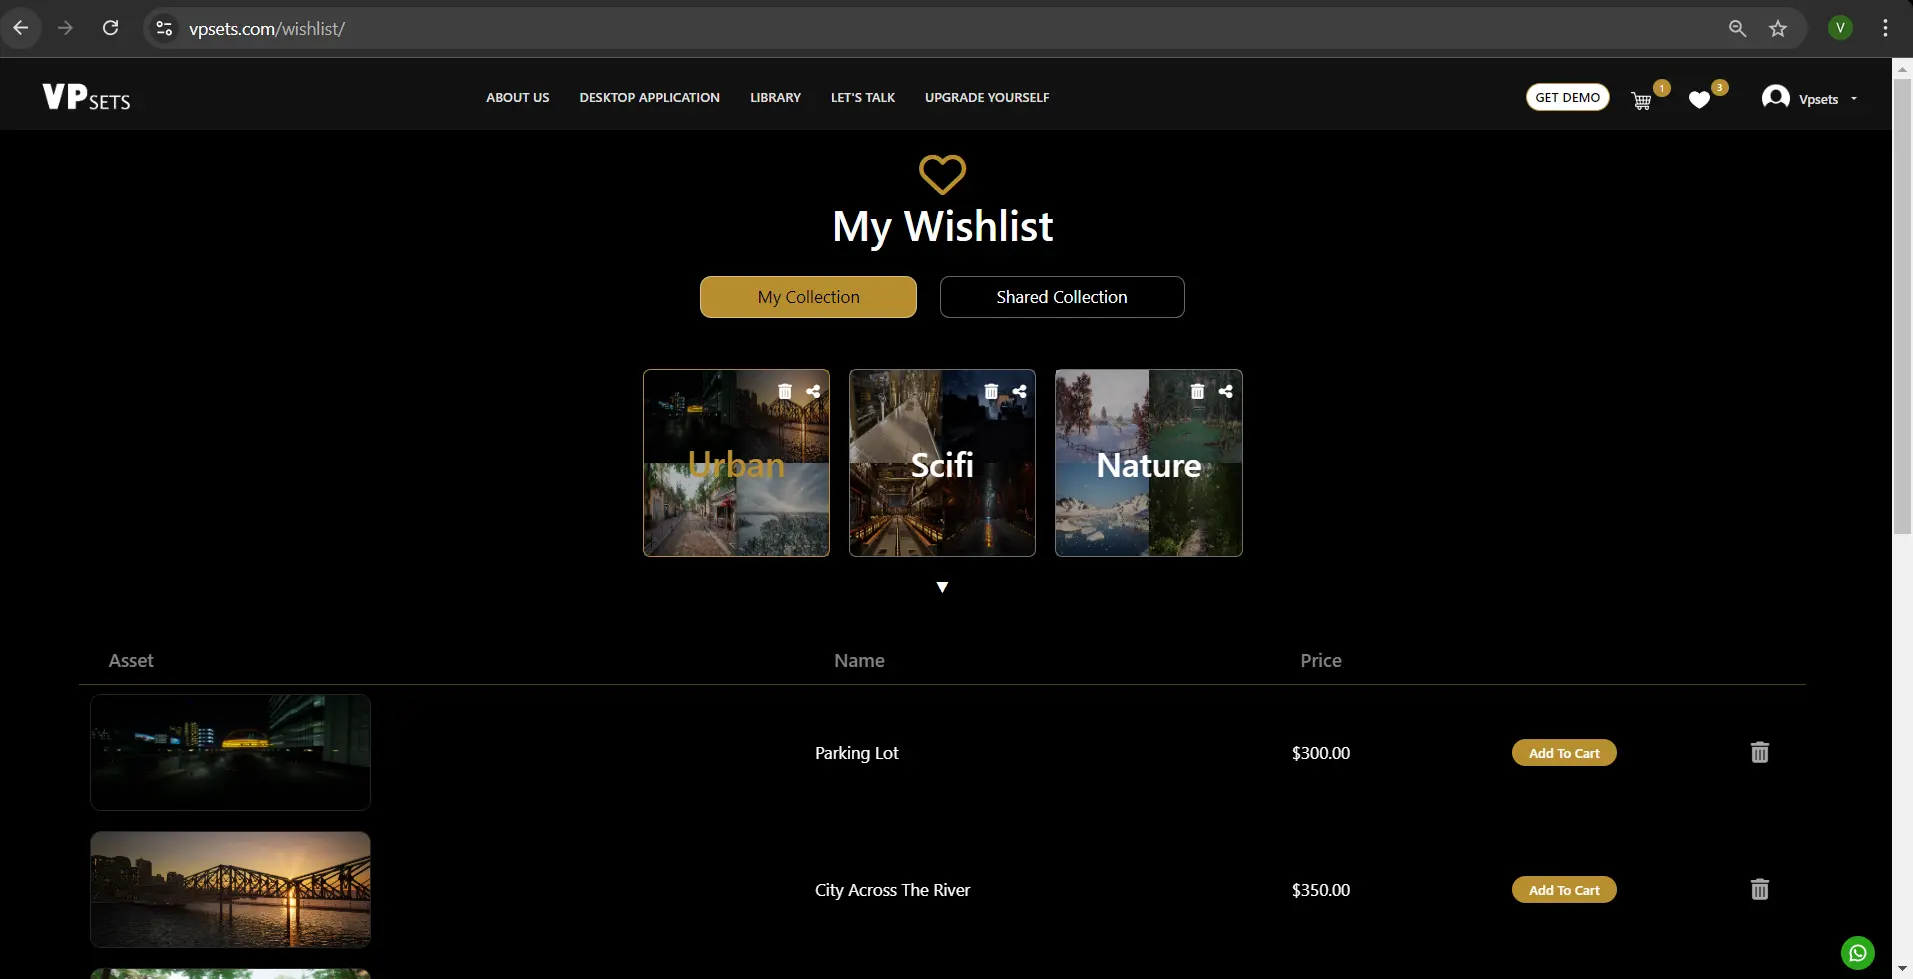
To manage your favorite assets, utilize the Wish List feature with the following steps:
Add Assets to a Wish List: After exploring assets, you can add them to a wish list. You have the option to either create a new wish list or use an existing one to save your selected assets.
Create a Favorite Collection: Compile your favorite assets by adding them to your wish list. This allows you to easily access and manage your preferred assets in one place.
Share Your Wish List: From your wish list, you can share it with other users, enabling them to view the assets you’ve selected.
Delete Assets from the Wish List: If you wish to remove certain assets, you have the option to delete them from your wish list at any time.
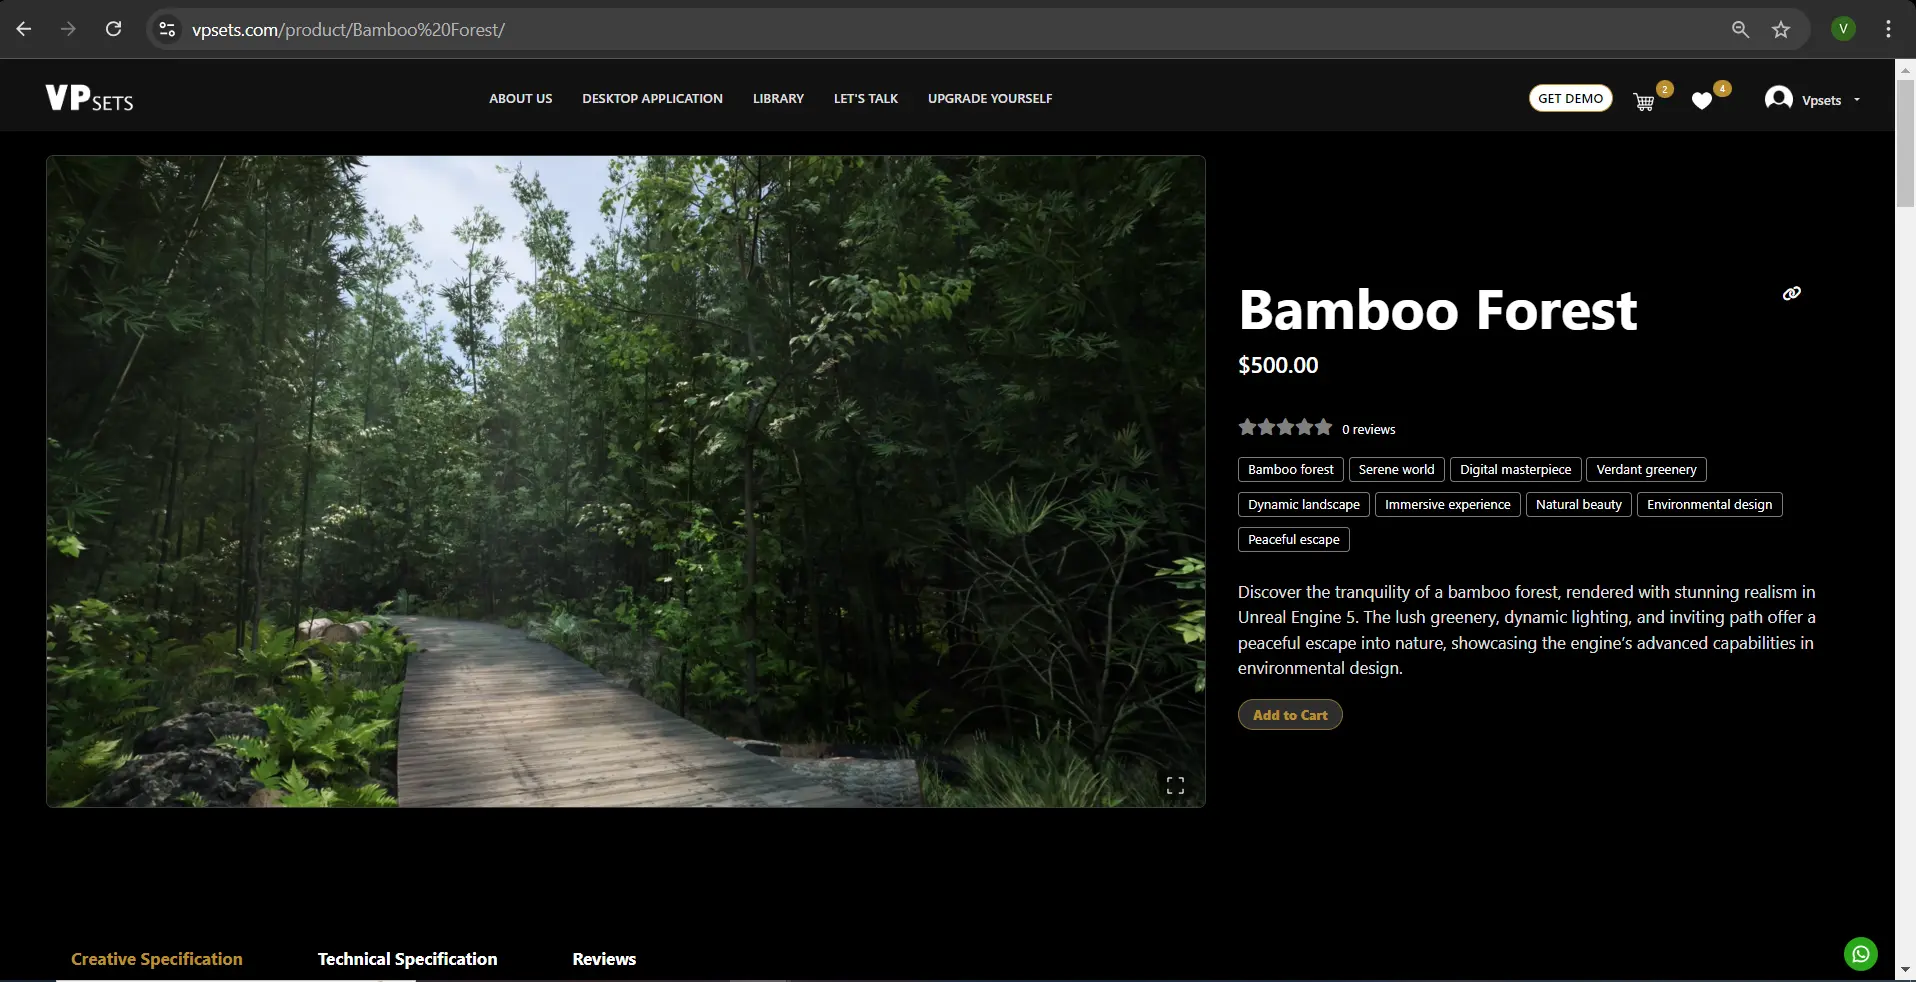
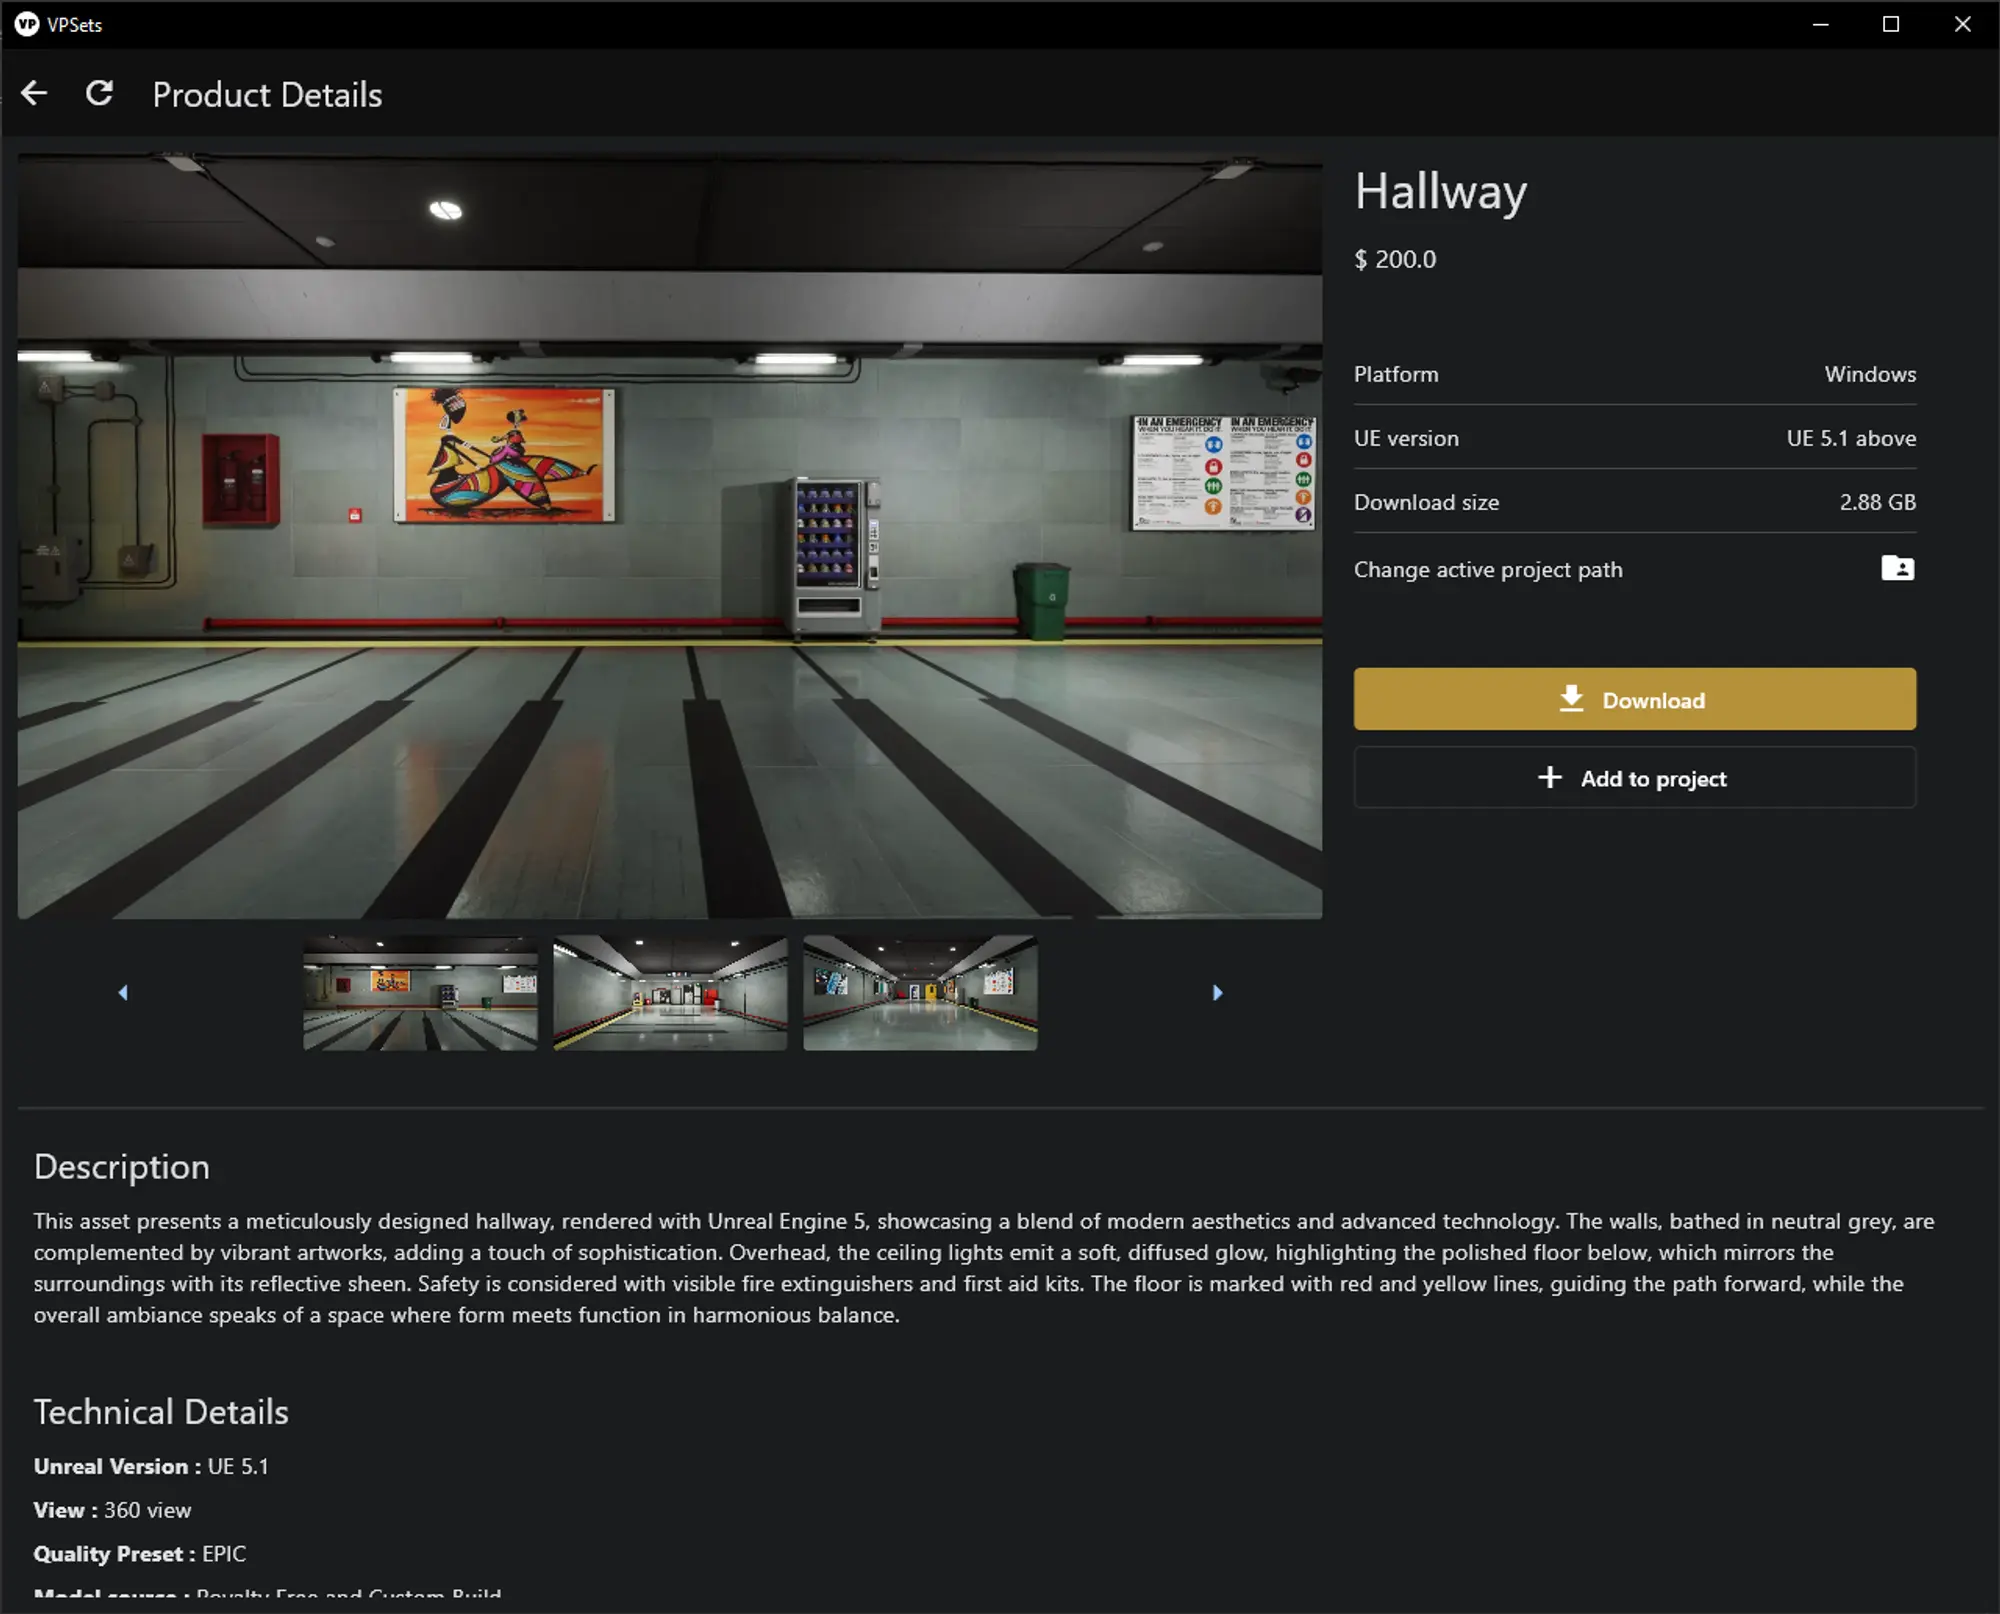
From the library or browse section of the website, navigate through the available assets and click on the product you are interested in to view its details.
After being redirected to the Product Details Page, you will have access to the following information:
Product Description: Here, you will find a comprehensive overview of the asset, including a summary of its key features and functionalities. This description provides essential insights into what the asset offers.
Media: The Product Details Page features visual elements to aid your decision-making, including high-quality images of the asset from different angles for a closer look at its appearance and condition, as well as a product video preview.
Specifications: Review detailed specifications such as dimensions, weight, compatibility, and other relevant technical information to ensure the asset meets your specific needs.
Ratings and Reviews: On this page, you can view existing ratings and reviews from other users to gauge the asset’s performance and quality. Additionally, you have the option to add your own rating and review based on your experience with the asset.
Review and Select Your Asset: Before making a selection, take a moment to carefully review the details of the available assets, including their specifications, availability, and rental terms. Once you are familiar with the asset’s information, choose the asset you wish to rent.
Add to Cart and Navigate to Cart: After selecting the asset, click on the “Add to Cart” button to place the asset into your shopping cart. To view and manage your selected assets, click on the “Cart” icon, usually located at the top right corner of the page or within the navigation menu. This will direct you to your shopping cart, where you can review and proceed with your rental.
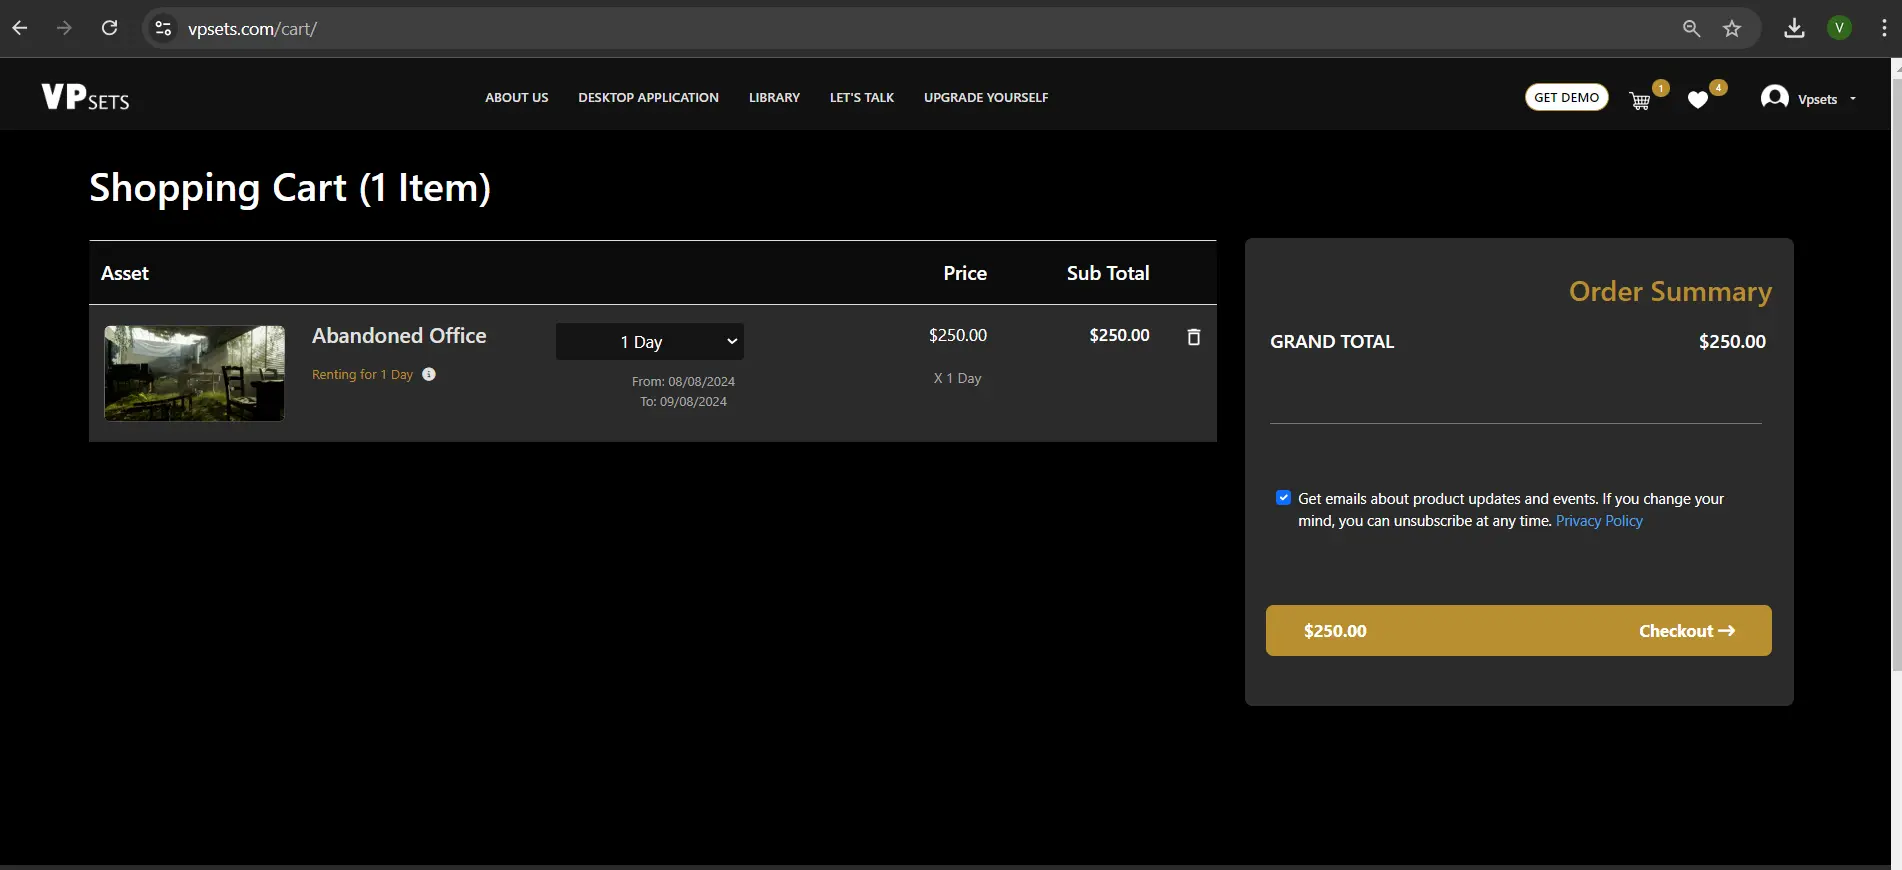
Managing Your Cart:
On the Cart Page, you can easily review the assets you've added, with details including the asset name, the number of rental days, and the subtotal for each item. If you need to make changes, you have the flexibility to adjust the rental days directly on this page, either increasing or decreasing the number of days as needed. If you decide that you no longer need an asset, you can delete it from your cart entirely with a simple click.
Once you’ve reviewed all items and made any necessary adjustments, click the "Checkout" button to proceed. This action will redirect you to the Payment Page, where you can finalize your rental process.
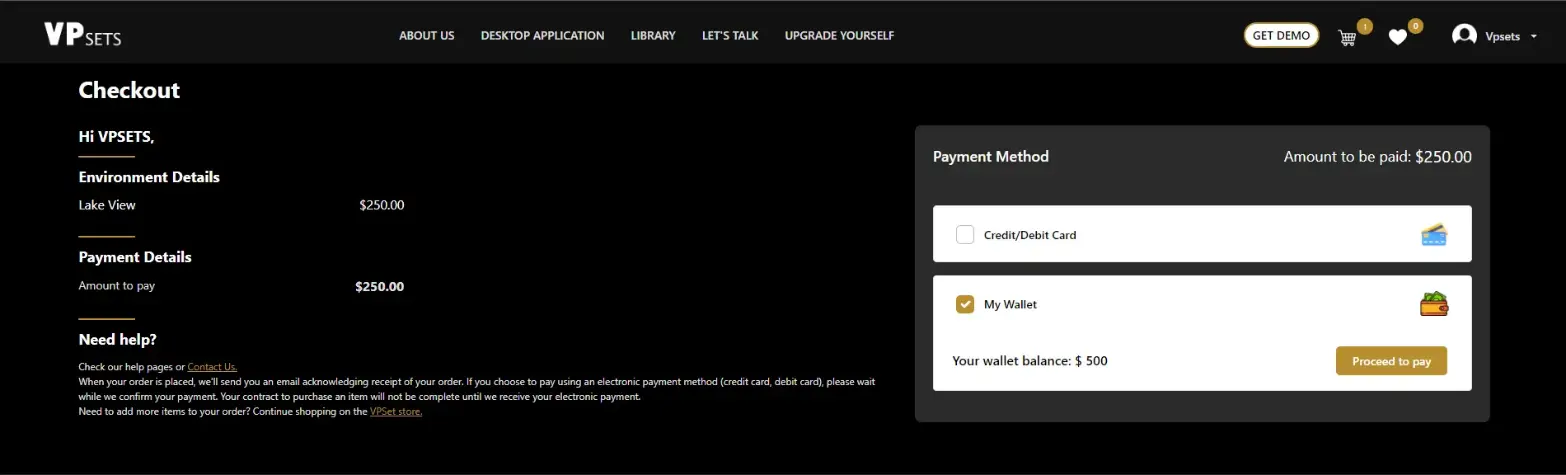
After clicking the checkout button, you will be redirected to the payment page. Here, you have two options for completing your purchase:
Credit/Debit Card: Select this option and enter your card details as requested to finalize your payment.
My Wallet: Choose this method to pay using your wallet balance.
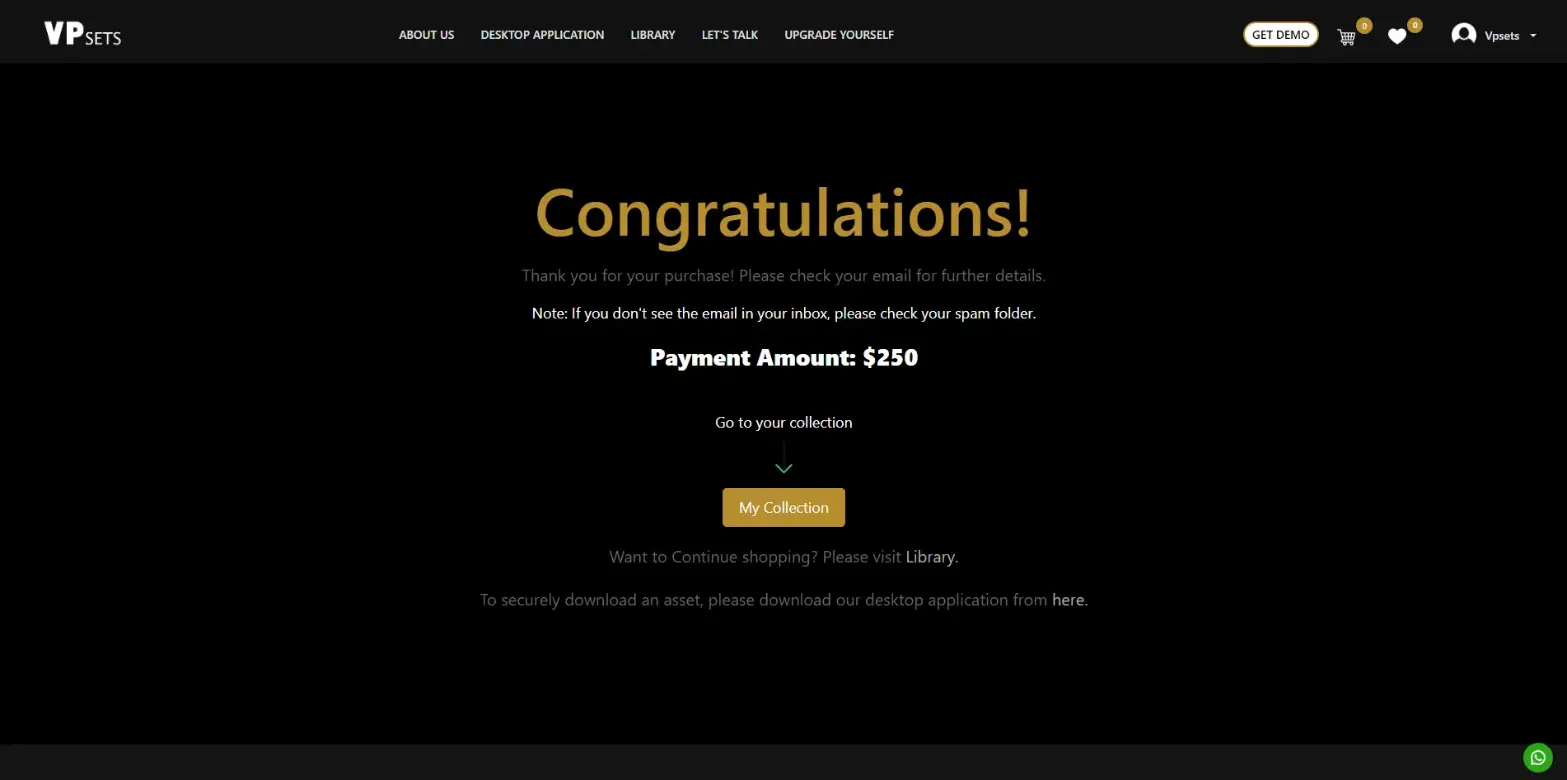
After finalizing your asset rental purchase, you are ready to start using your assets. Ensure that you have successfully completed the payment process before proceeding to the next steps.
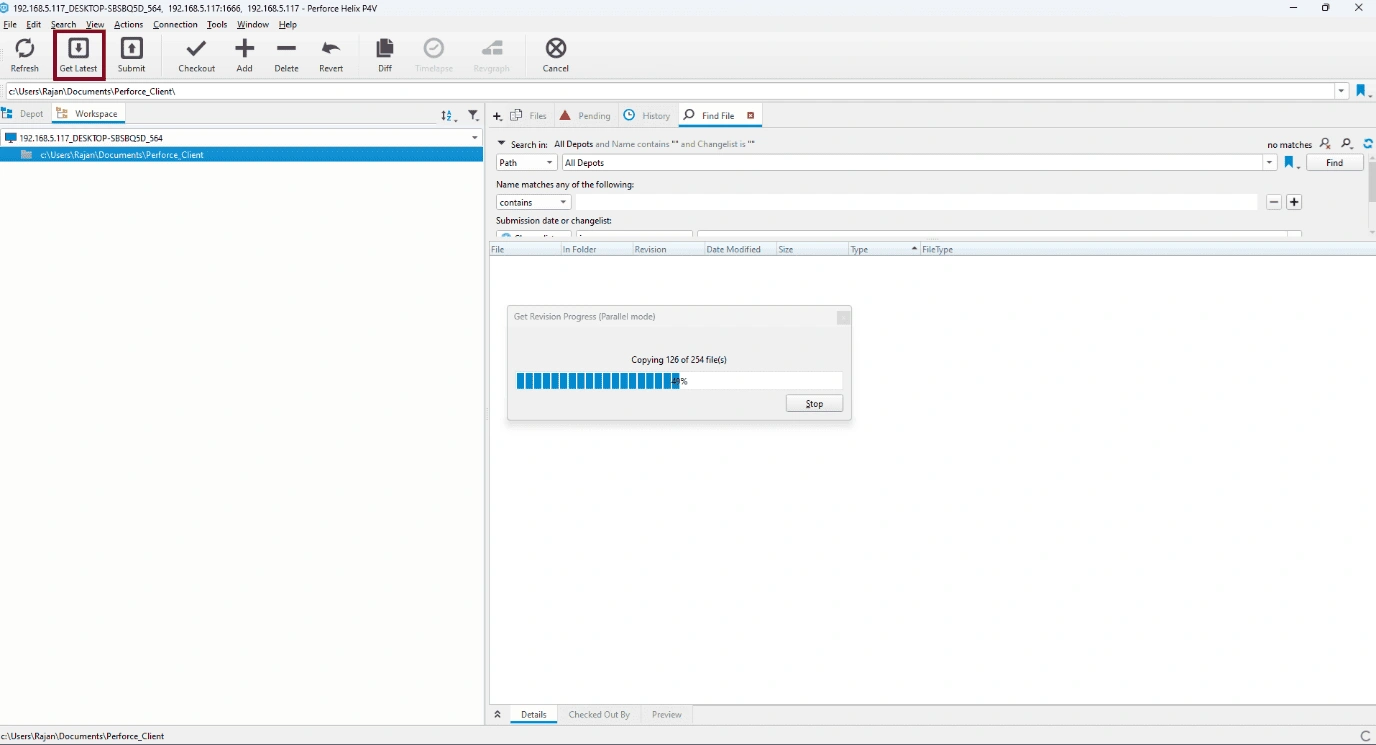
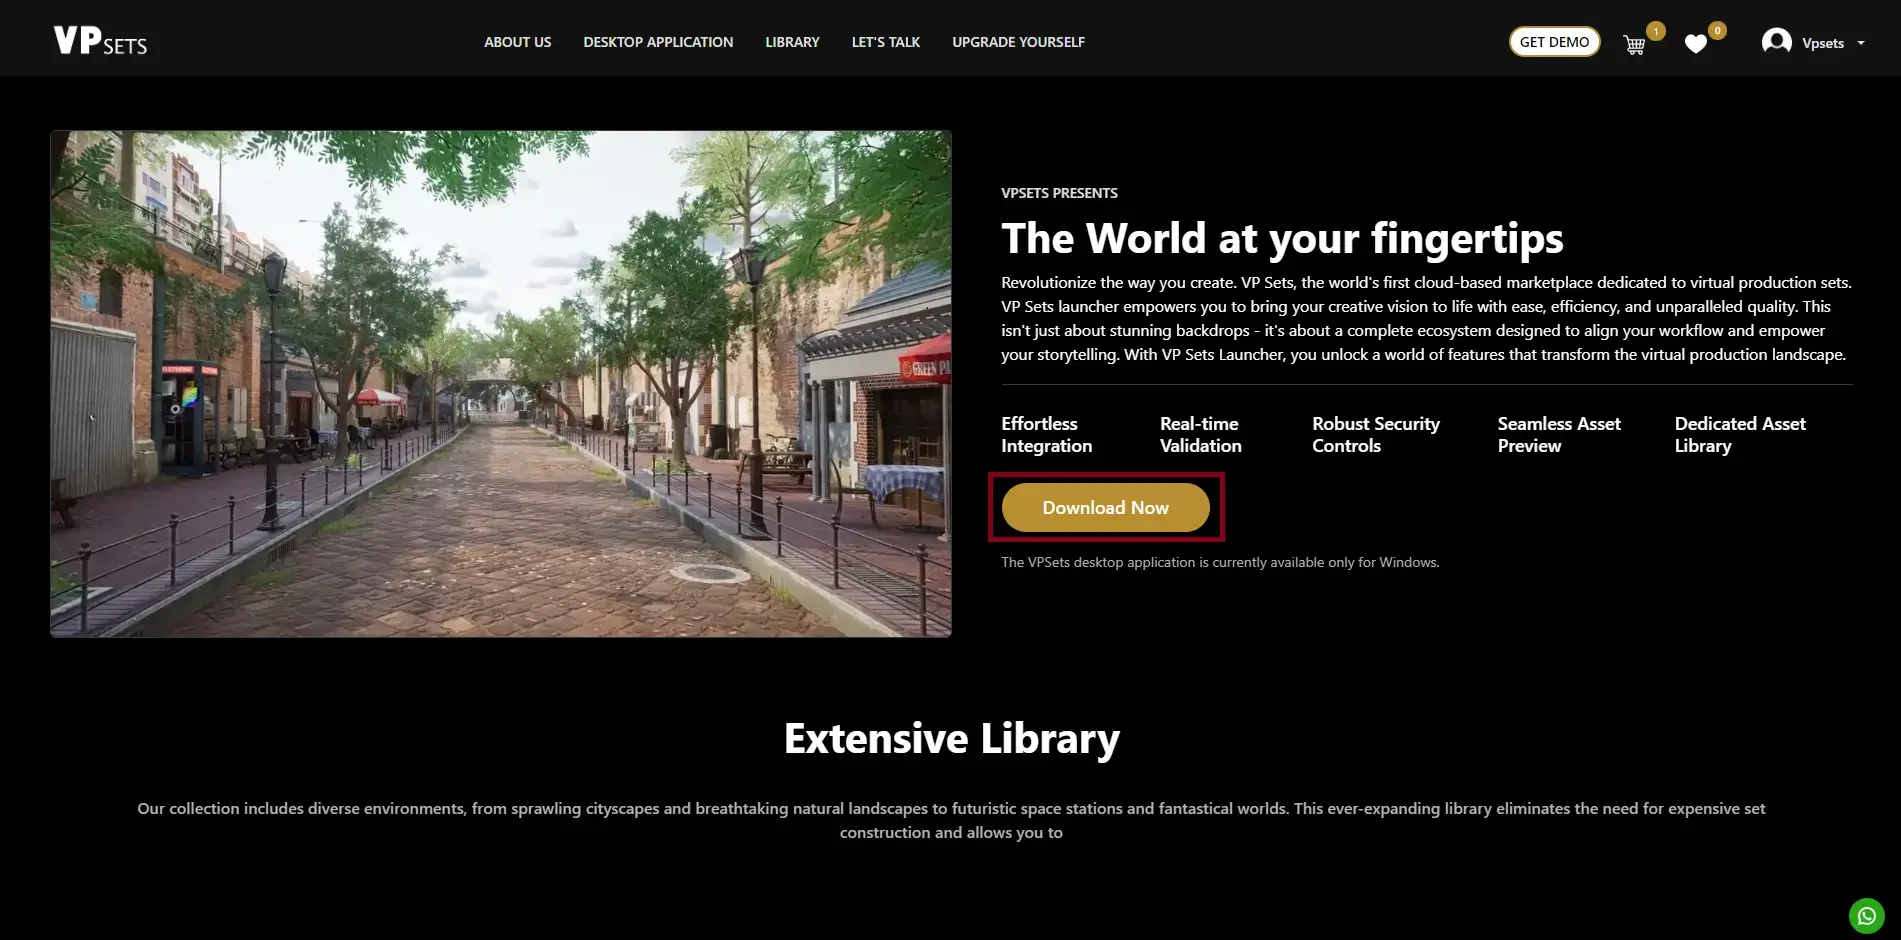
To download assets from our secure server, you need to have our desktop application installed.
To download the desktop application, use the provided link: “Download Desktop Application.” If you haven’t received the link or need additional access, you can also select "Desktop Application" from the navigation bar on our website.
Open the downloaded file and follow the on-screen instructions to install the application on your computer.
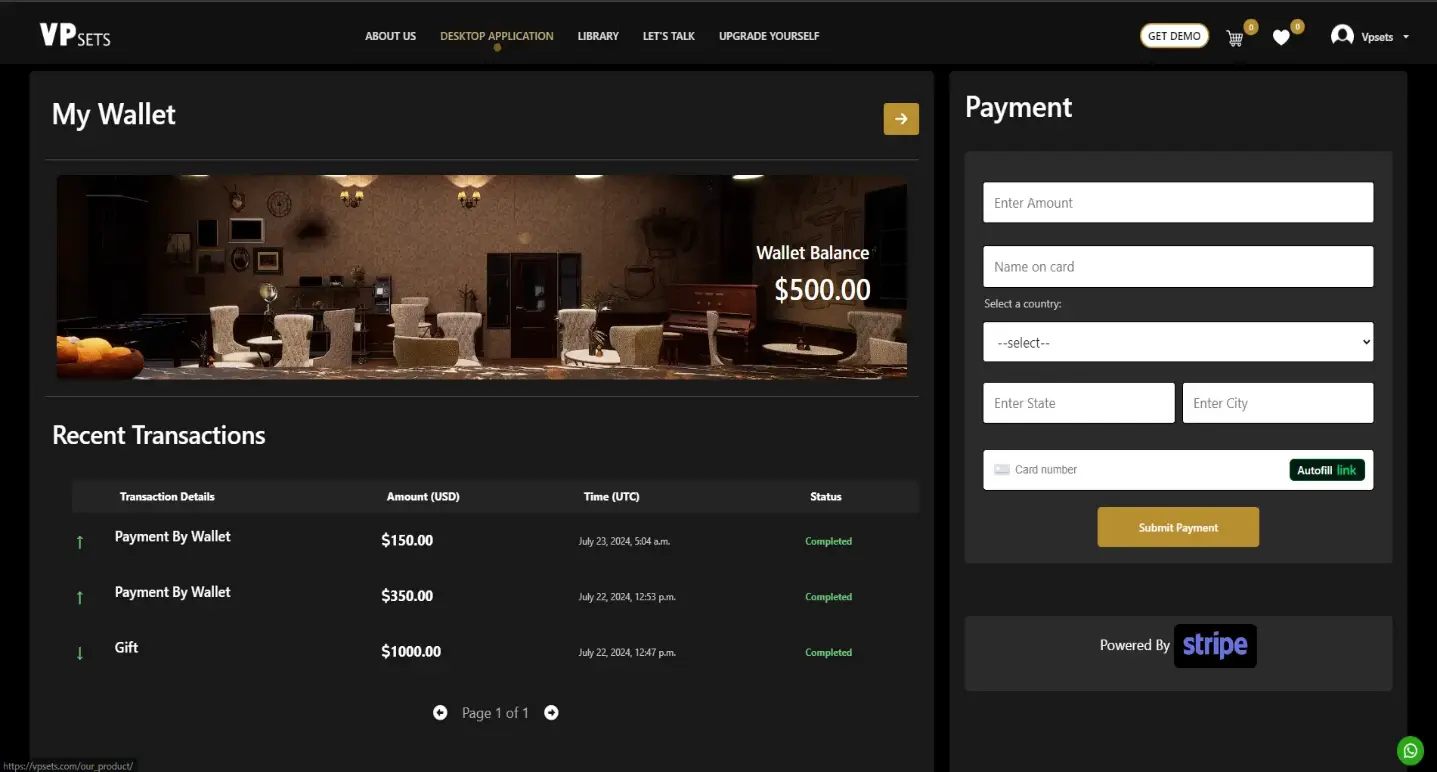
Add balance to your wallet:
Access My Wallet: Begin by clicking on the user profile icon, usually found in the top-right corner of the screen. From the dropdown menu, select "My Wallet" to navigate to the wallet management page.
Enter Payment Information: On the My Wallet Page, you’ll be prompted to enter several details. Specify the amount you wish to add to your wallet. Then, provide your payment information, including your card details (Name on Card, Card Number, MM/YY, CVV) and billing address (Country, State, City)
Submit Payment: Double-check that all entered information is accurate. Once verified, click on the submit button to process the payment and add the funds to your wallet.
After completing these steps, your wallet balance will be updated with the added amount, ready for use in future transactions.
Desktop Application
Our desktop application makes accessing and using your purchased assets easy and convenient. With its user-friendly interface and powerful features, it enhances your experience and boosts productivity.
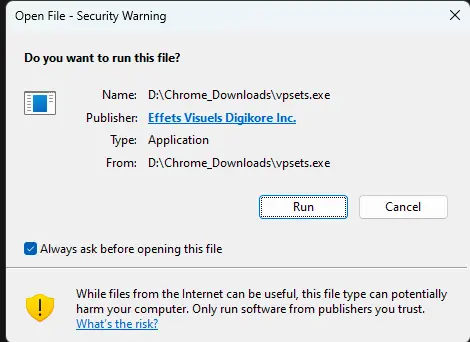
Downloading the EXE File from the Website:
Go to our website and locate the navigation bar. Select "Desktop Application" from the navigation options.
On the Desktop Application page, find the download button for the EXE file.
Click the download button to start downloading the EXE file to your computer.
Choose a location on your computer to save the EXE file where you can easily find it.
Wait for the download to complete before proceeding to the installation step.
Setting Up the Desktop Application:
Navigate to the folder where the downloaded file is saved.
Double-click the EXE file to start the installation process.
A setup wizard will appear. Follow the on-screen instructions to complete the installation.
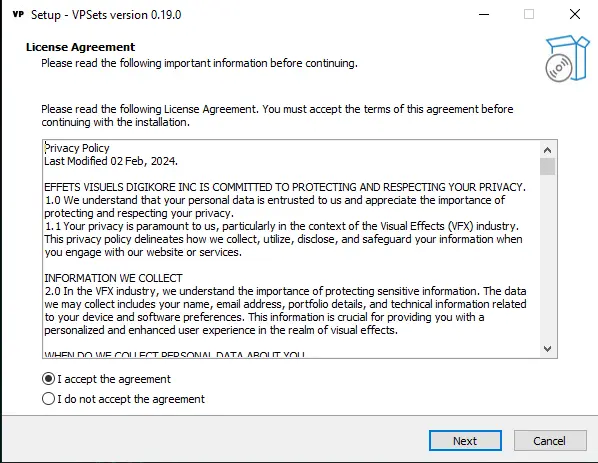
Review and accept the license agreement when prompted.
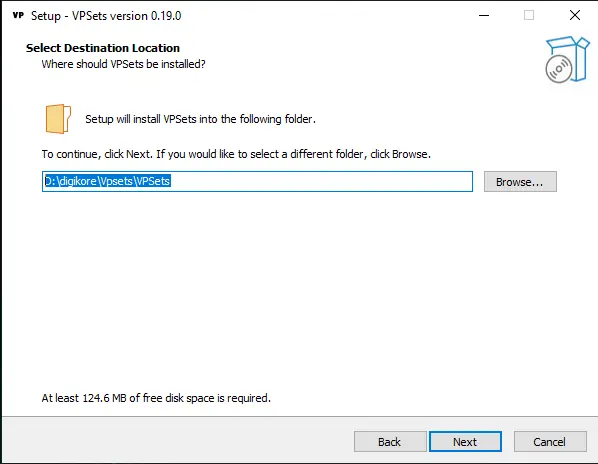
Choose your desired installation location or accept the default path provided.
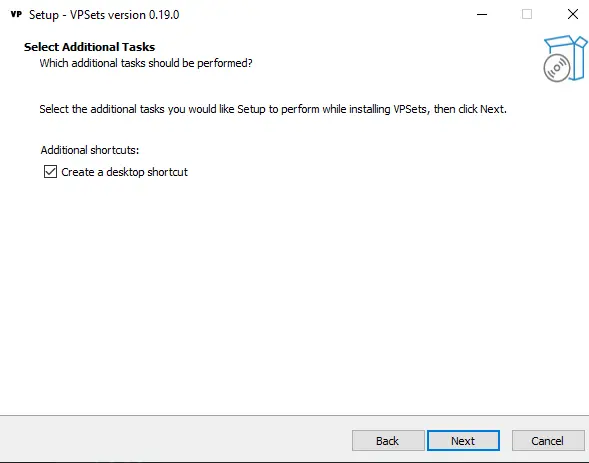
Select any additional tasks you’d like to perform, such as creating a desktop shortcut.
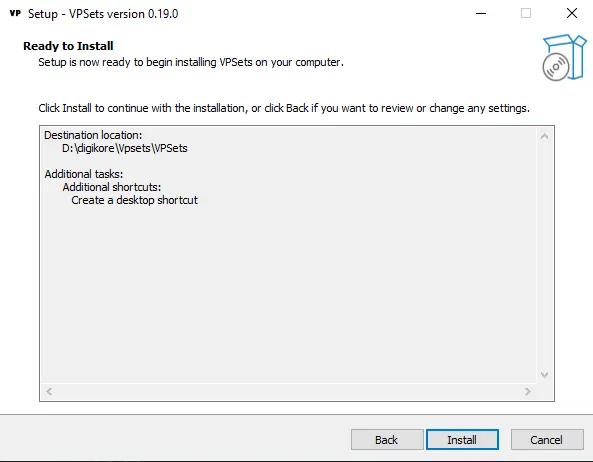
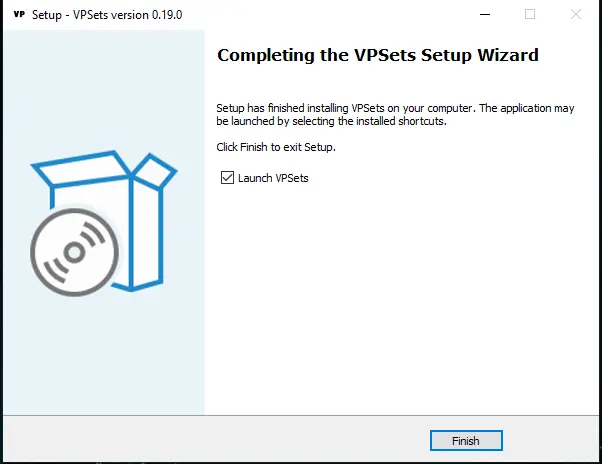
On the "Ready to Install" screen, review your settings, confirm that everything is correct, and click the "Install" button to begin the installation.
Once the installation is complete, you will see the "Finish" screen. Here, you can choose to launch the application by checking the "Launch VP Sets" box. Click the "Finish" button to exit the setup wizard.
Refer to the screenshots below for a visual guide to each step.
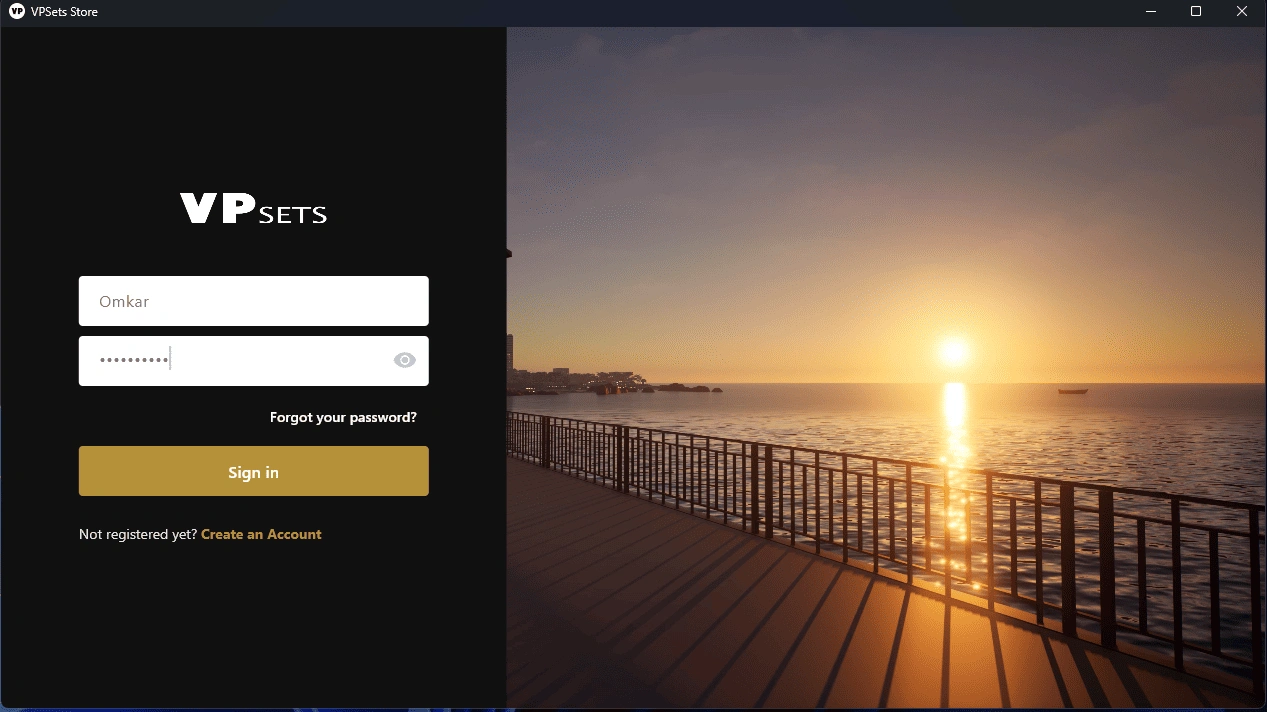
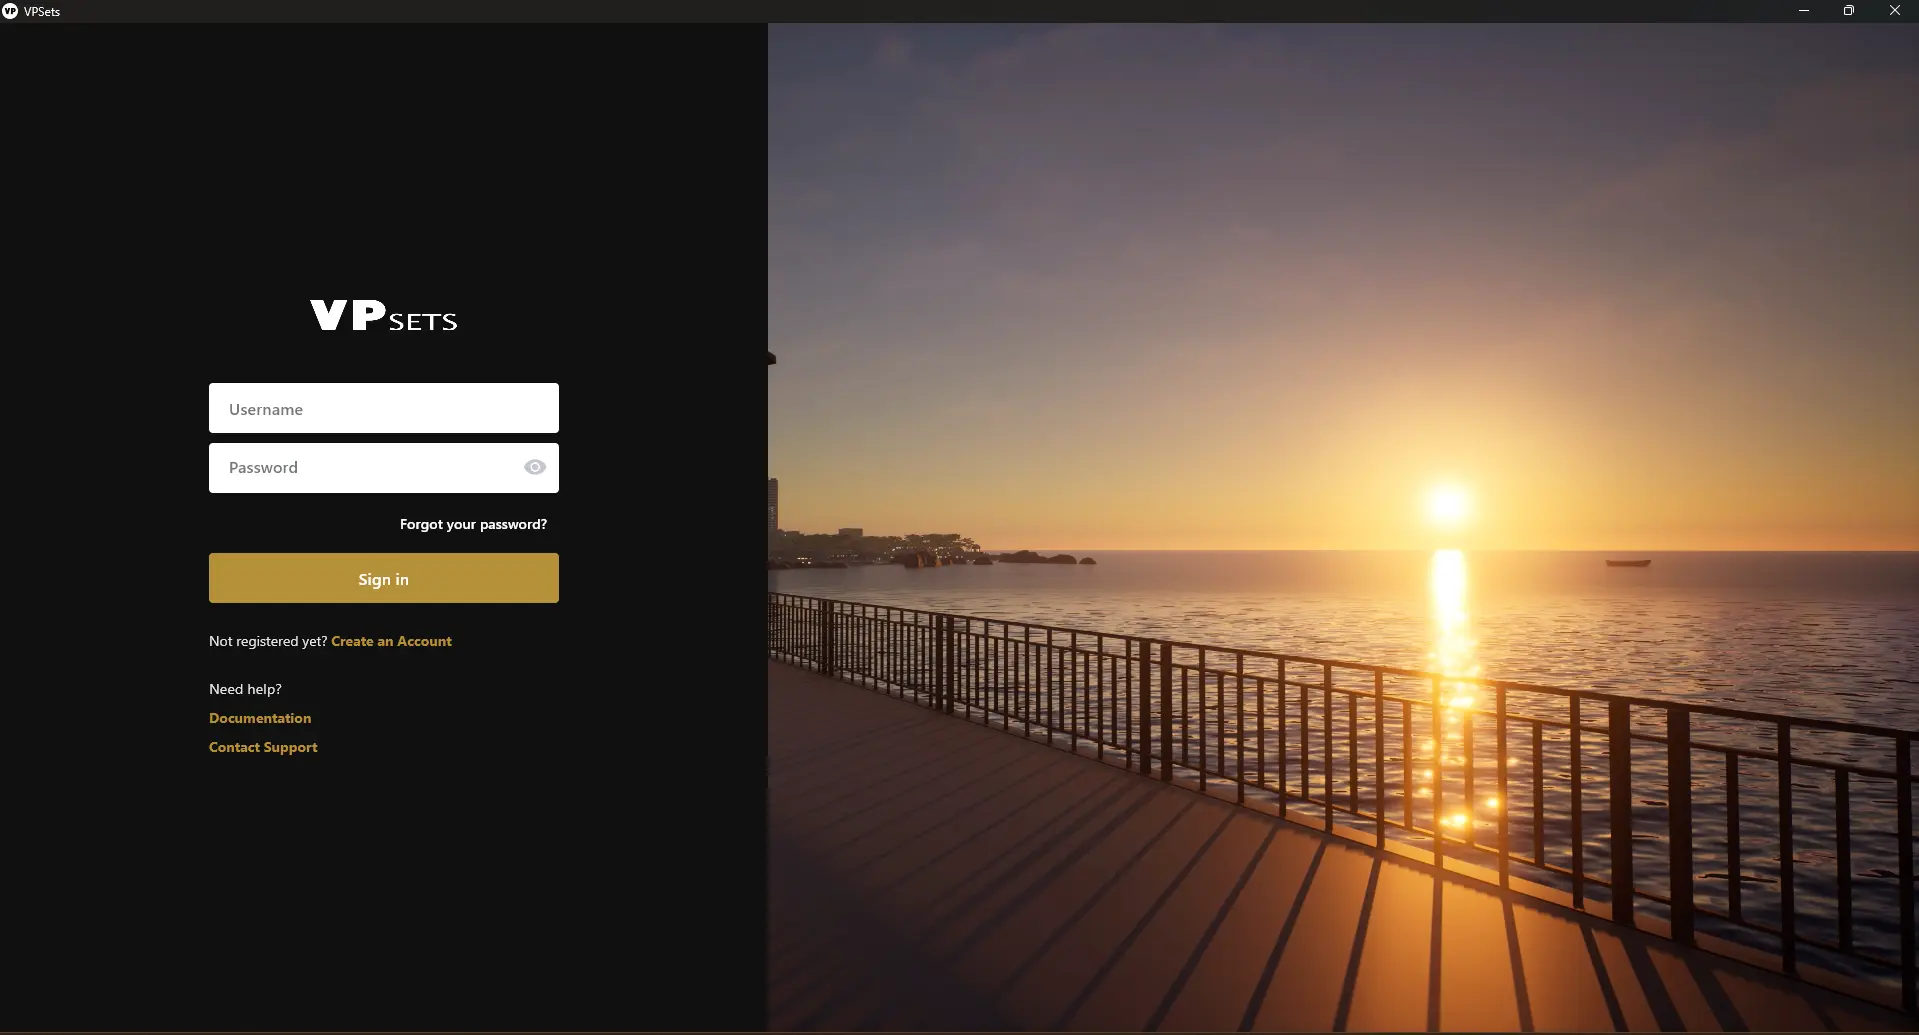
Log in to the desktop application:
Follow these steps to log in to the desktop application
Double-click the application icon on your desktop or find it in your Start menu to open the application.
Upon launching, the application will display the login screen if you are not already logged in. If you are already logged in, you will be redirected directly to the dashboard.
Enter your username in the "Username" field and your password in the "Password" field.
Click the "Login" button to proceed.
Once successfully logged in, you will be directed to the application’s dashboard, where you can begin using the application.
Other functionalities, such as viewing documentation or accessing additional support, will redirect you to our website
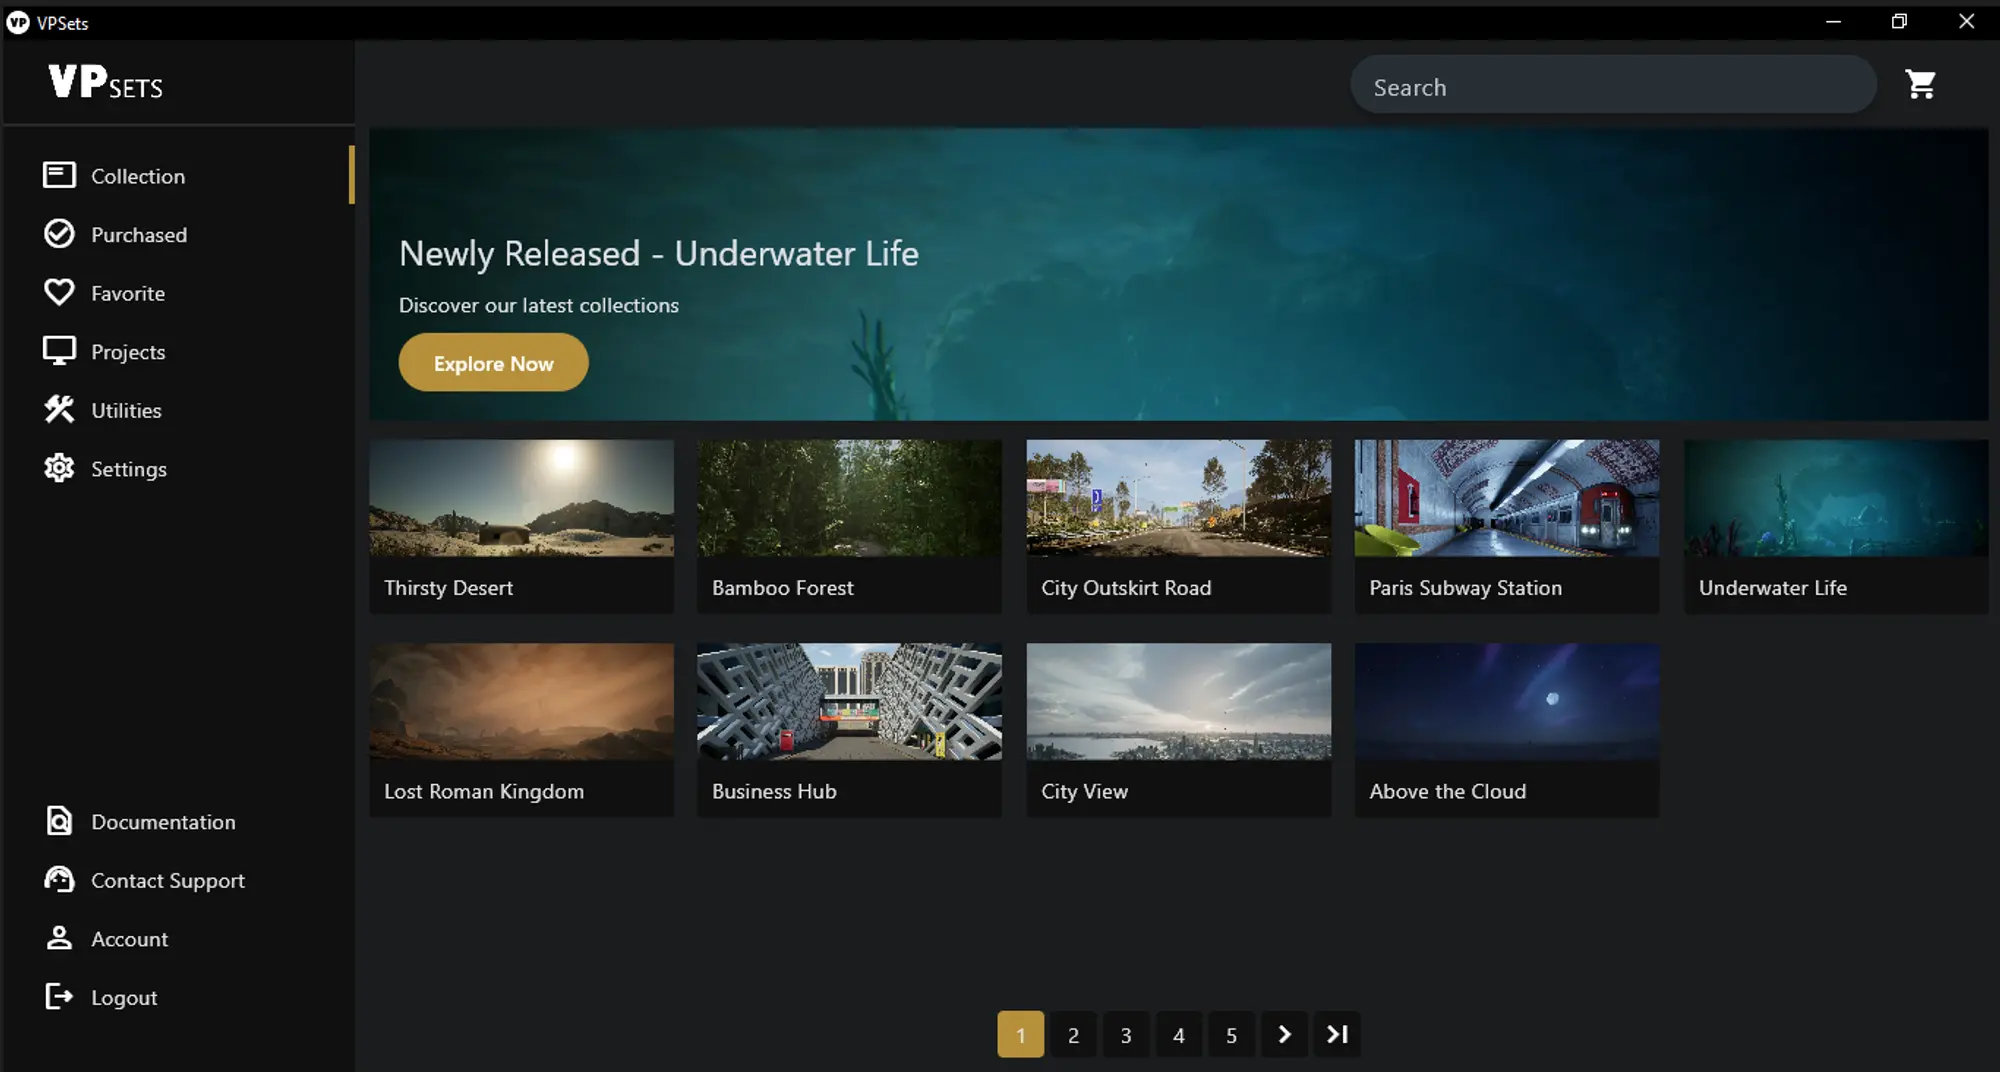
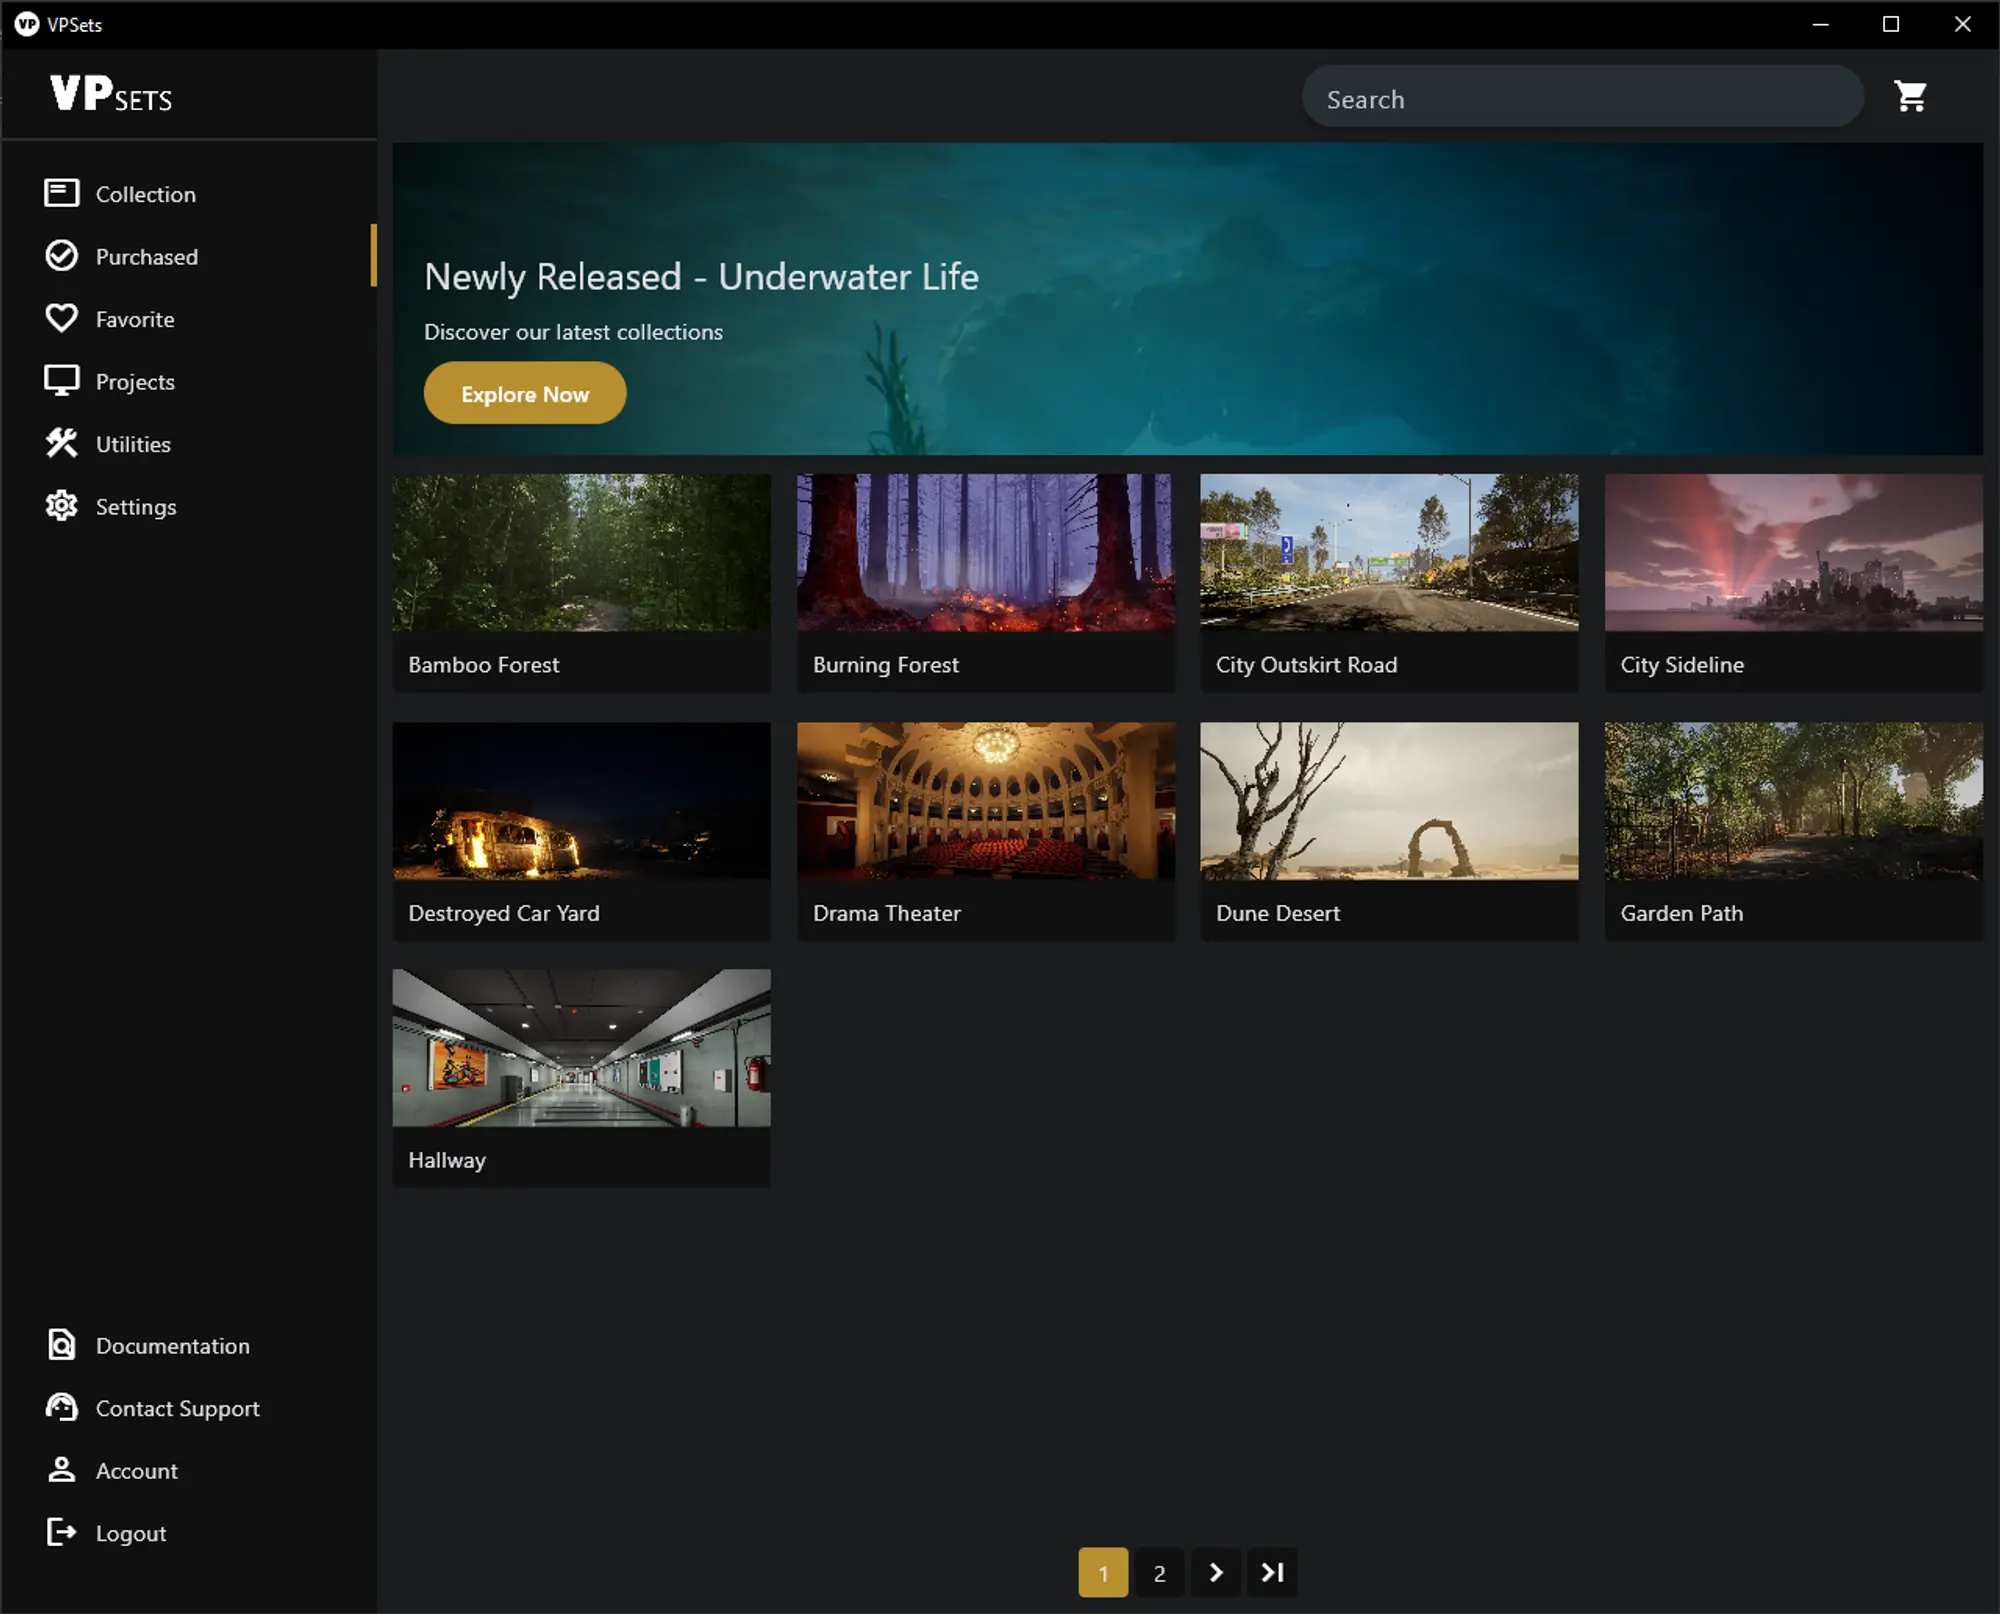
Dashboard Overview:
Dashboard is designed to give you quick access to key features and information. Below is an overview of each section available on your dashboard:
Collection: This section displays all assets available on the marketplace that can be rented.
Purchased: This section reflects the assets that you have rented.
Favorite: This section manages your Wishlist's. You can add items to your Wishlist and easily access and organize them as needed.
Projects: Manage and view the projects you are working on.
Utilities: This section includes various tools and utilities that enhance the functionality of the application. Access helpful features and settings related to your workflow.
Settings: Customize your application experience through the settings. Adjust preferences, configure options from this section.
Documentation: Click this button to be redirected to our website where you can access user manuals, guides, and other helpful documentation.
Contact Support: For assistance, click this button to be redirected to our website where you can reach out to our support team for help with any issues or inquiries.
Account: Manage your account details and preferences. Clicking this button will redirect you to our website where you can update your profile information, view account settings, and more.
Logout: Click this button to log out of the application. You will be signed out and redirected to the login screen.
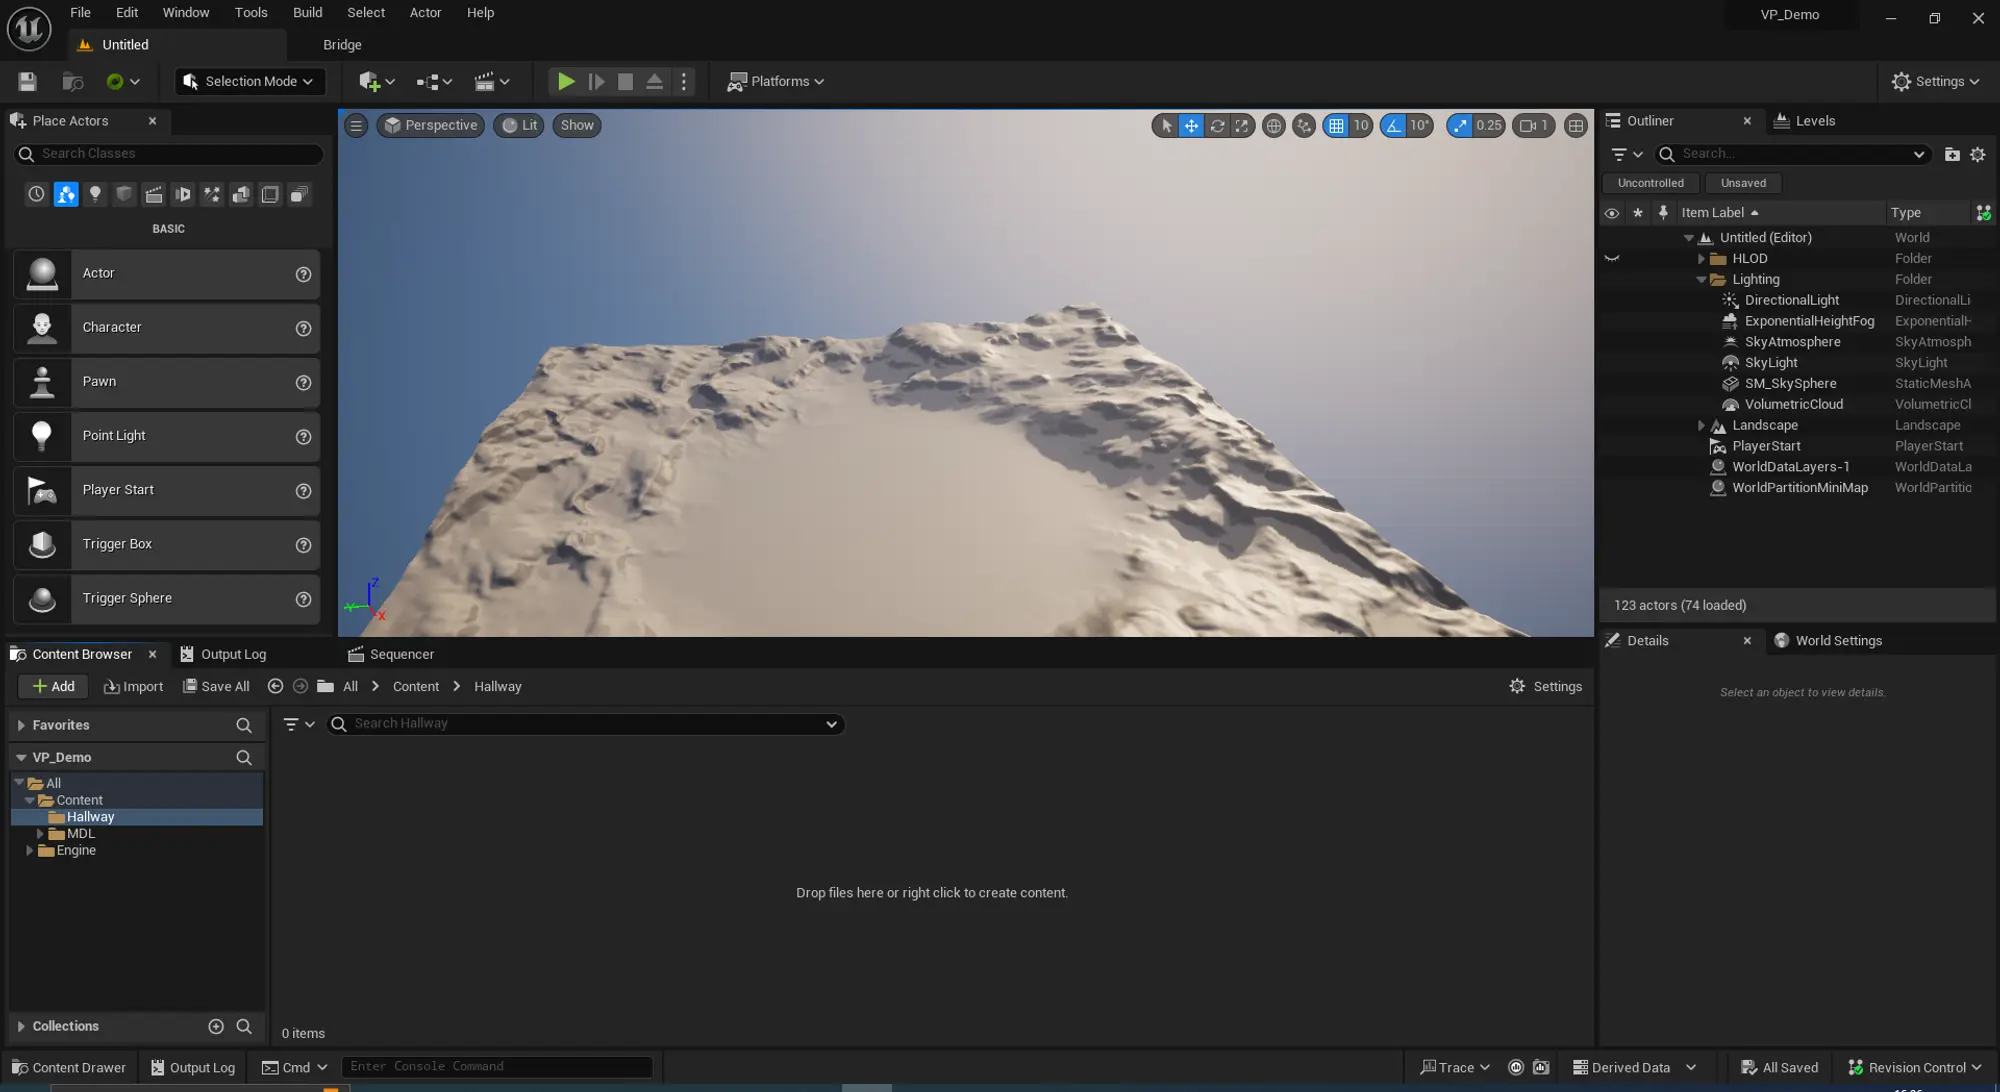
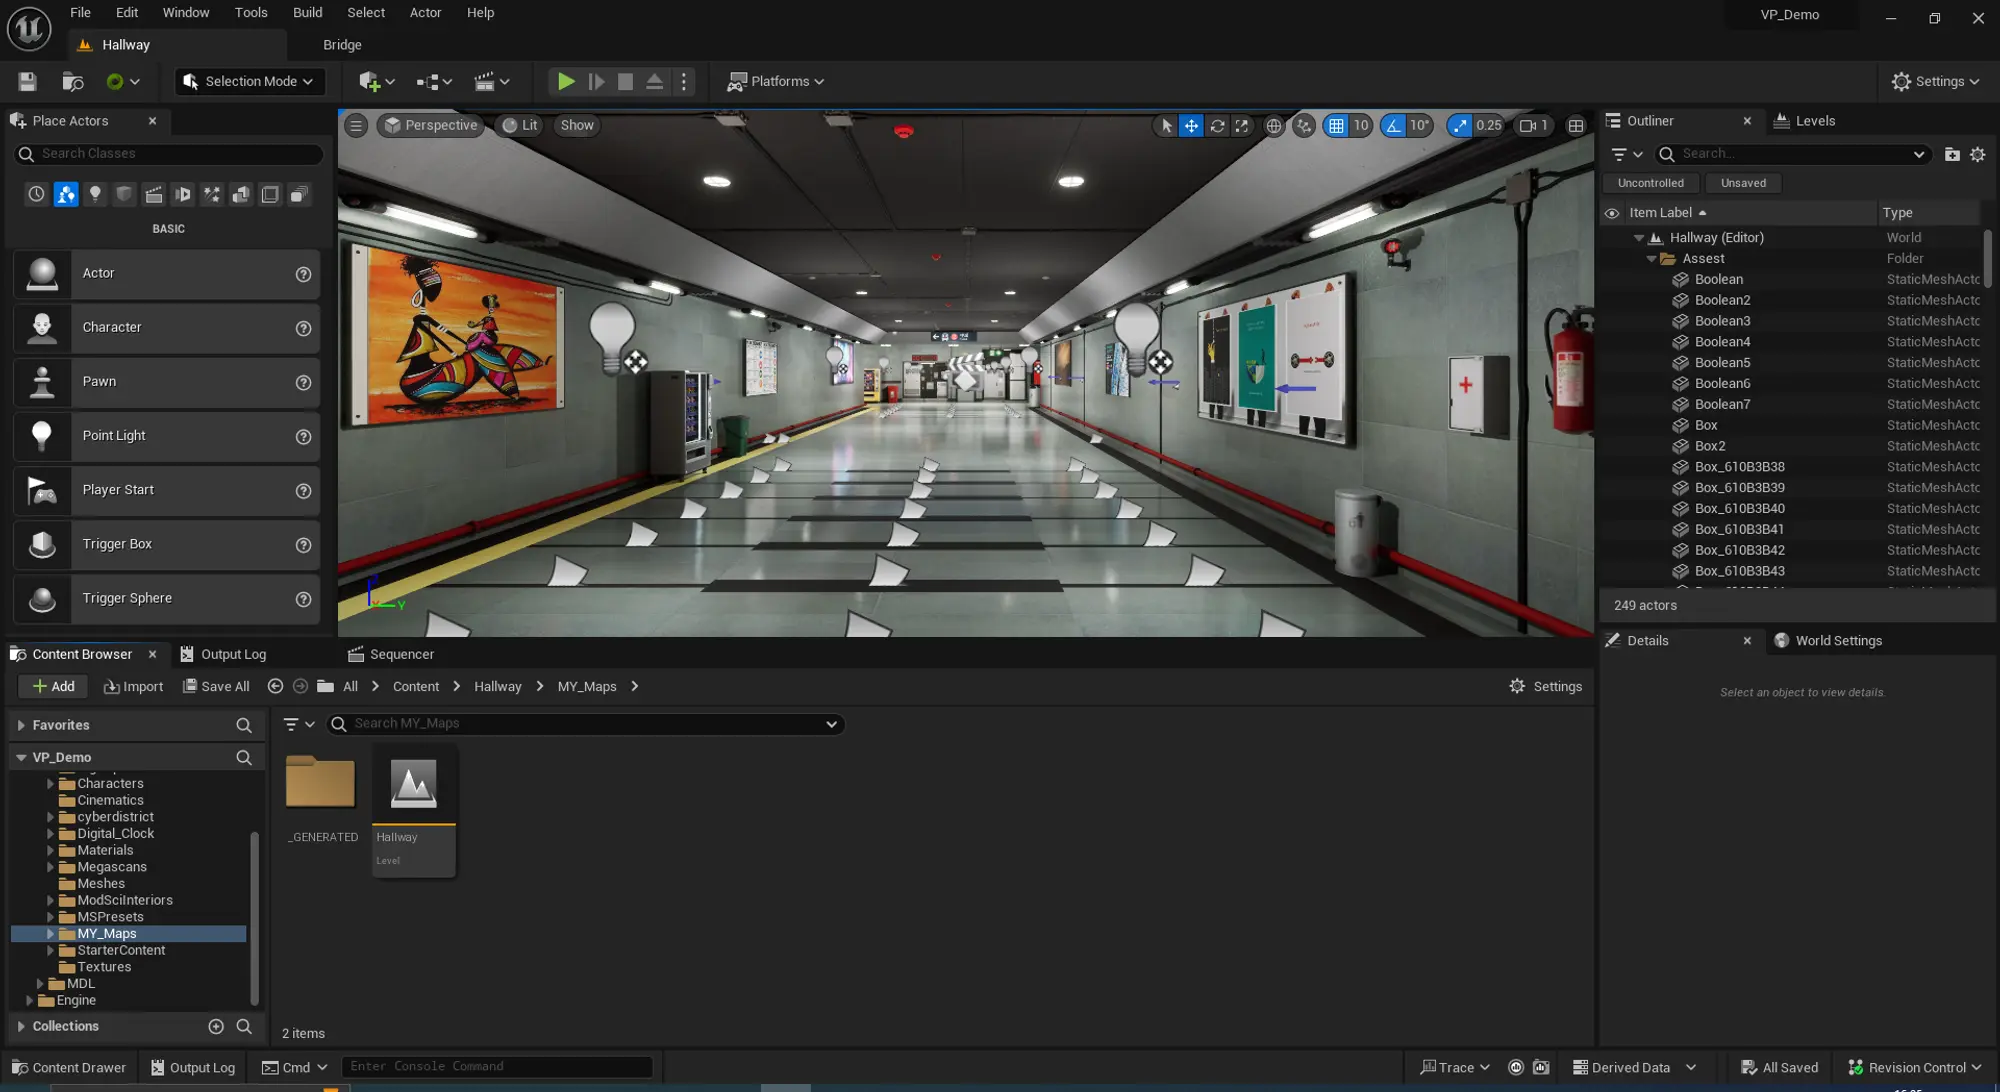
Using VP Sets Assets in Unreal Engine:
Open the desktop application and log in with your credentials.
Go to the "Purchased" section where you can browse all the available rented assets.
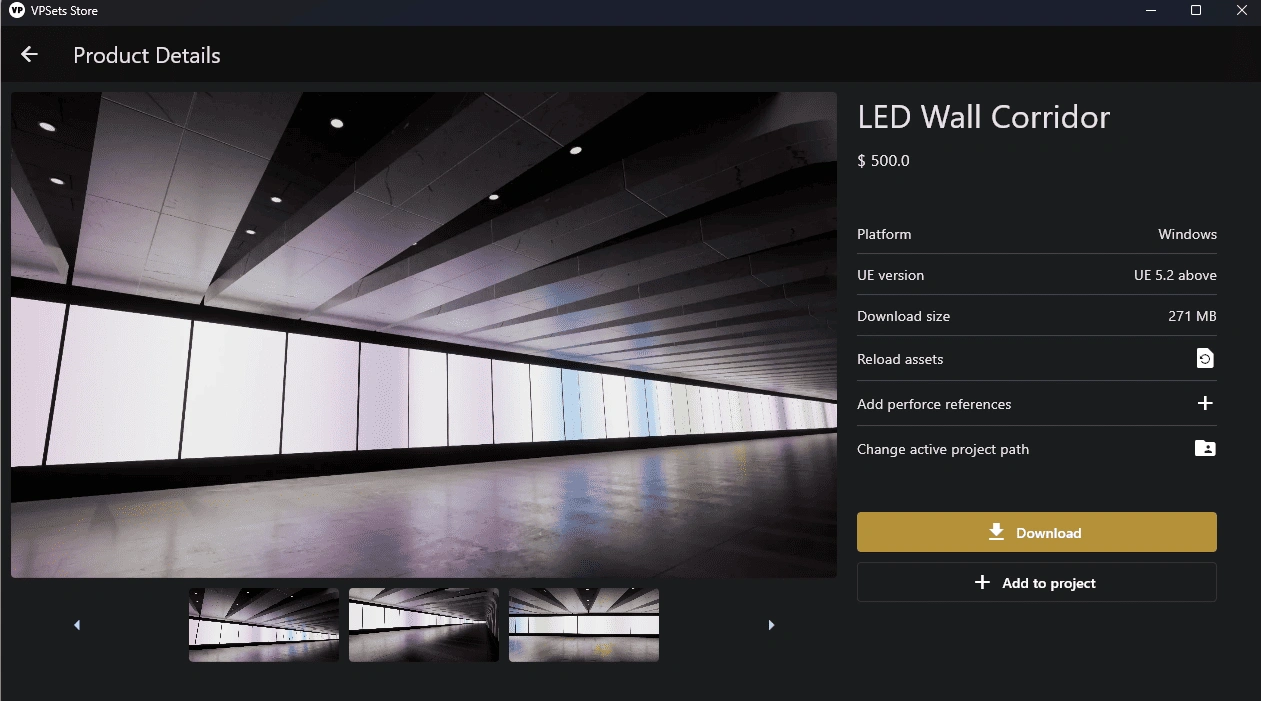
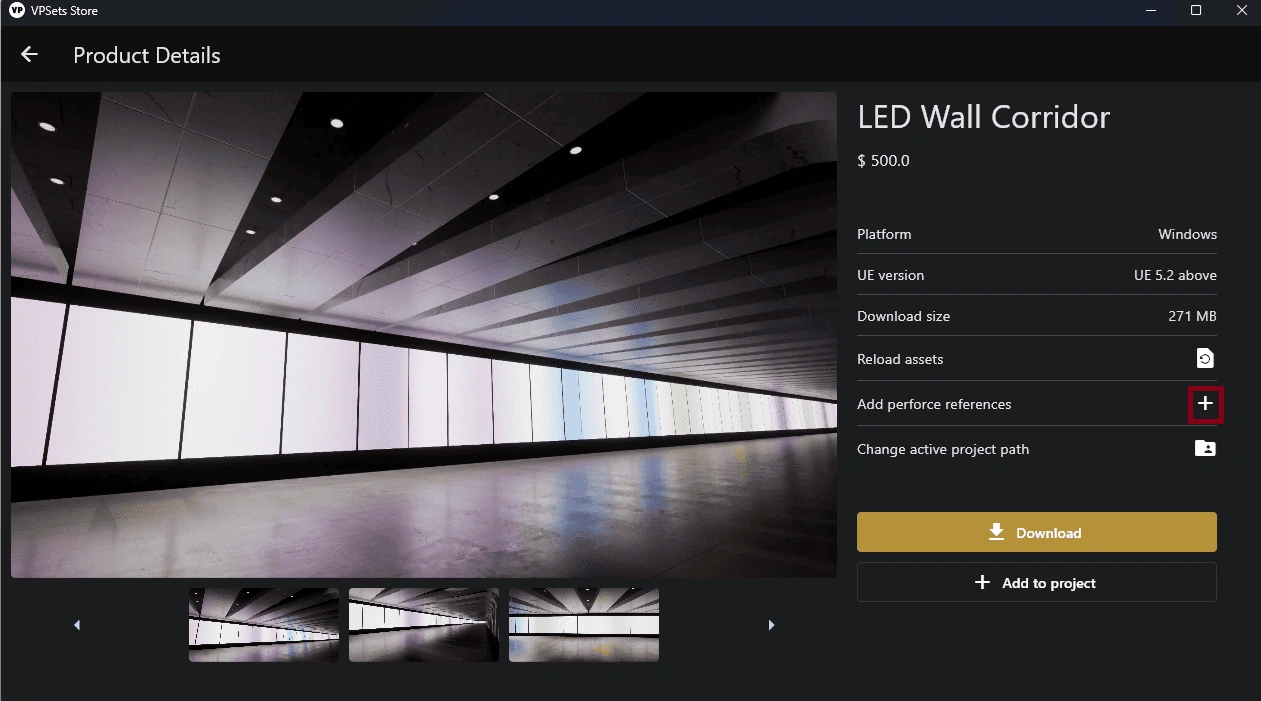
Find and select the VP Sets asset you want to use. Click on the asset to view its details.
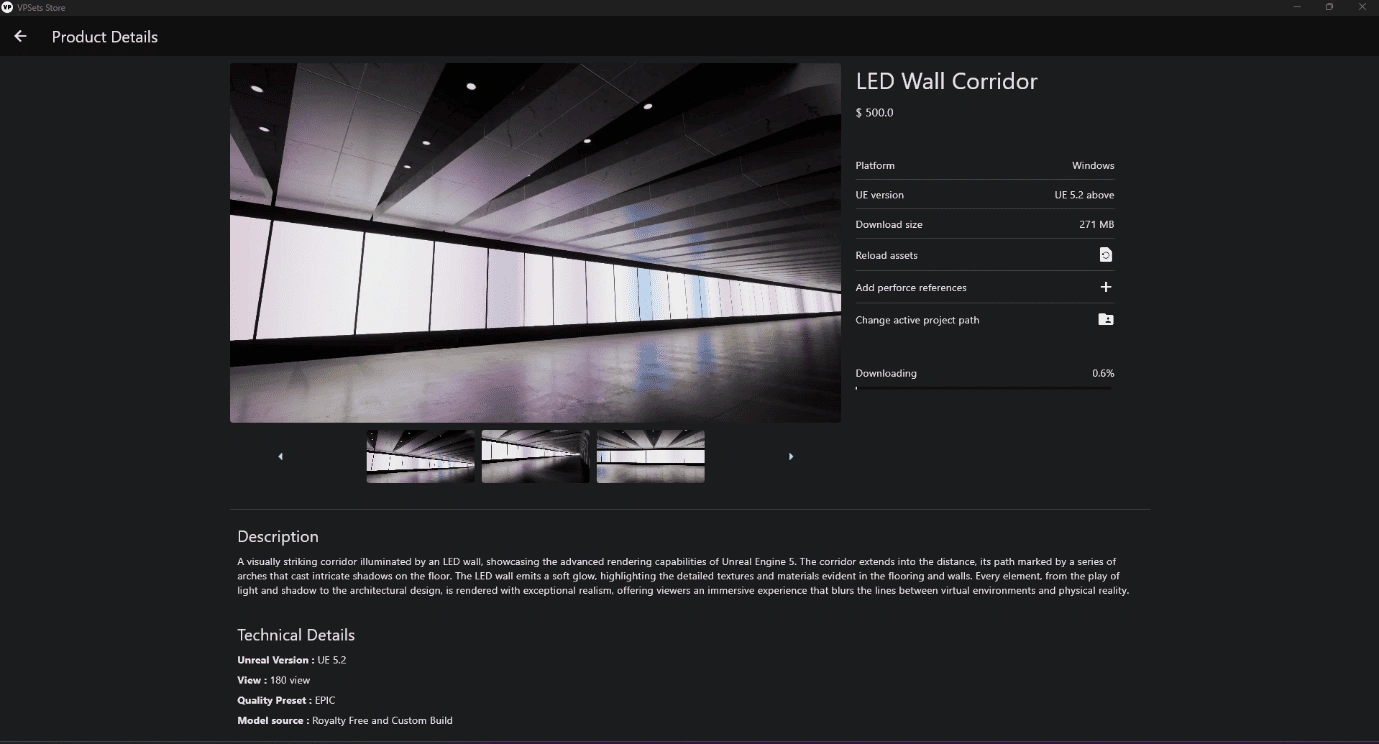
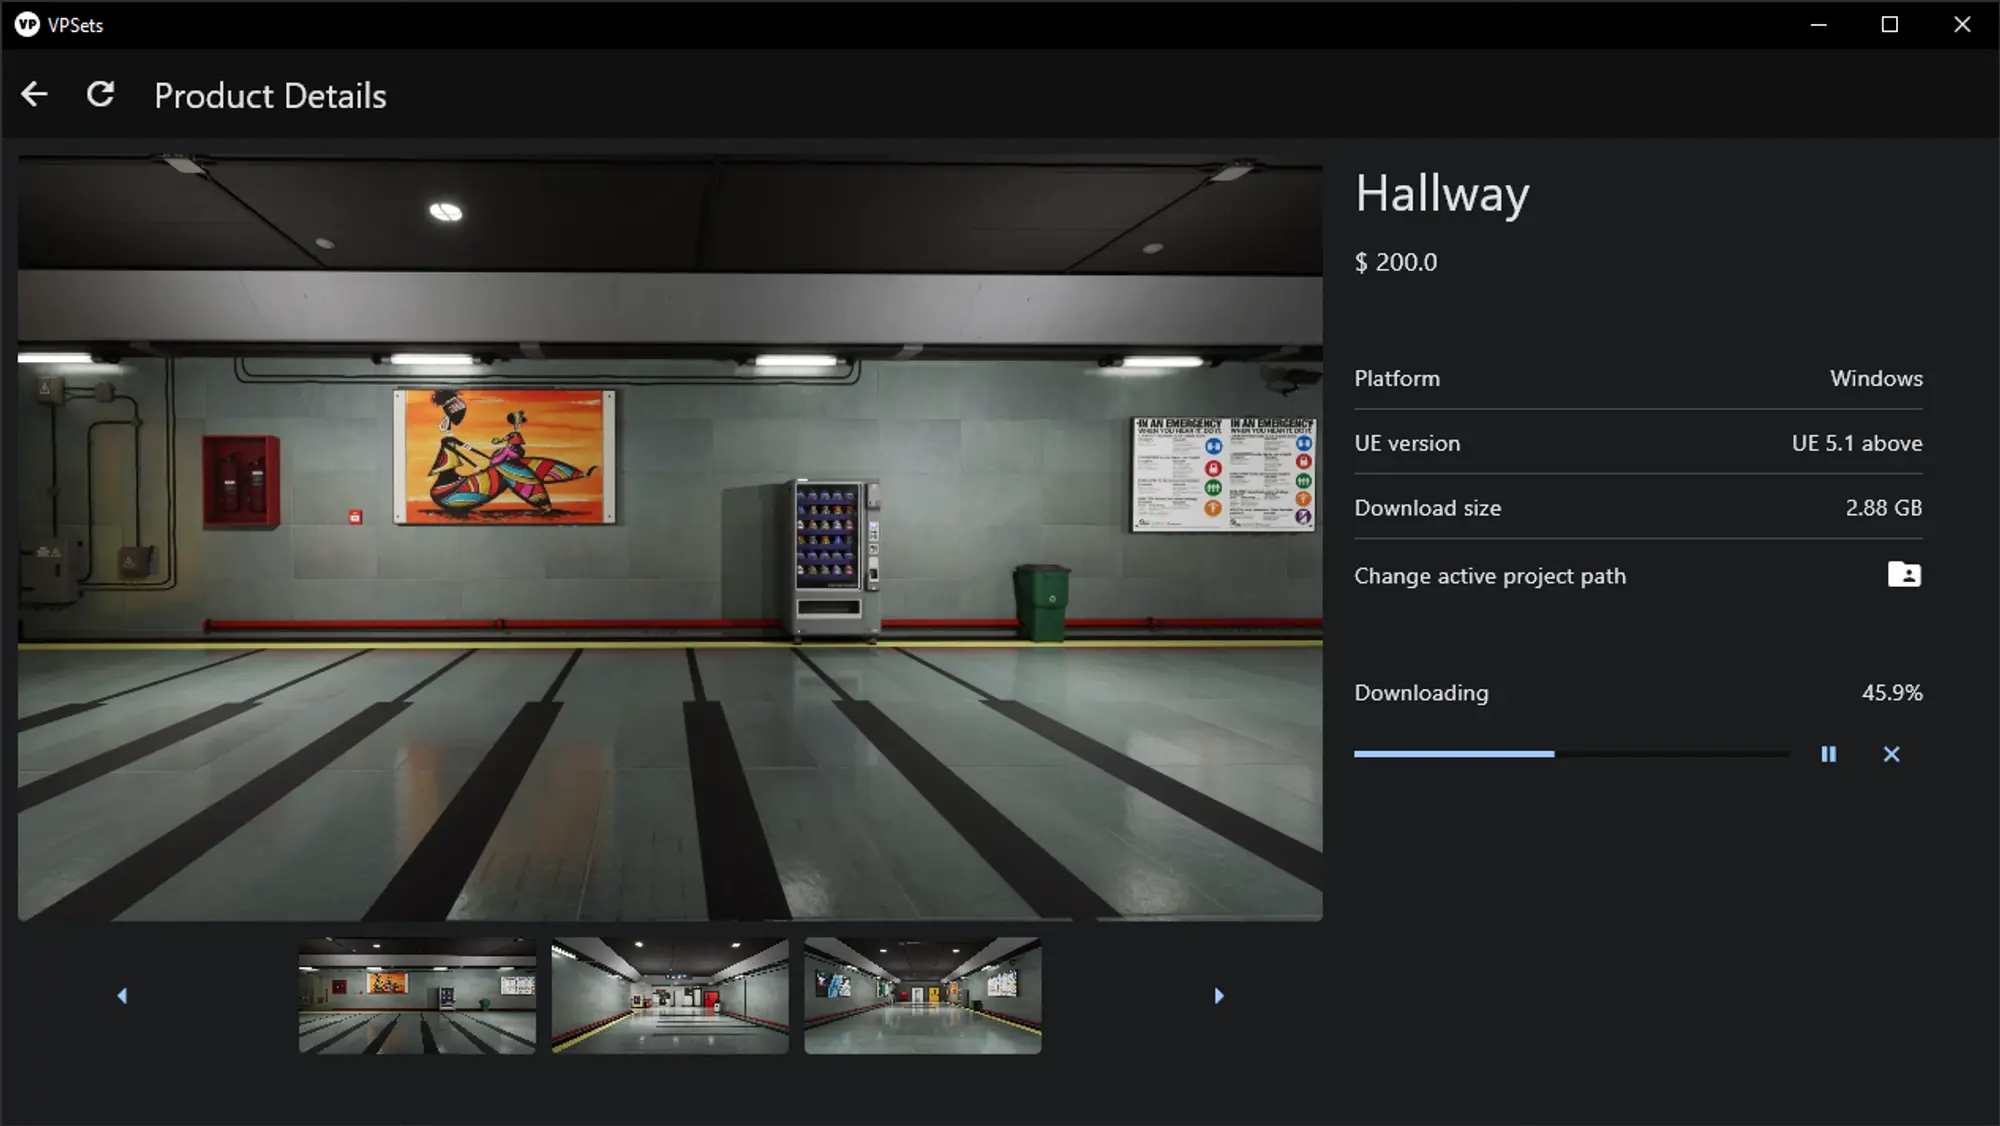
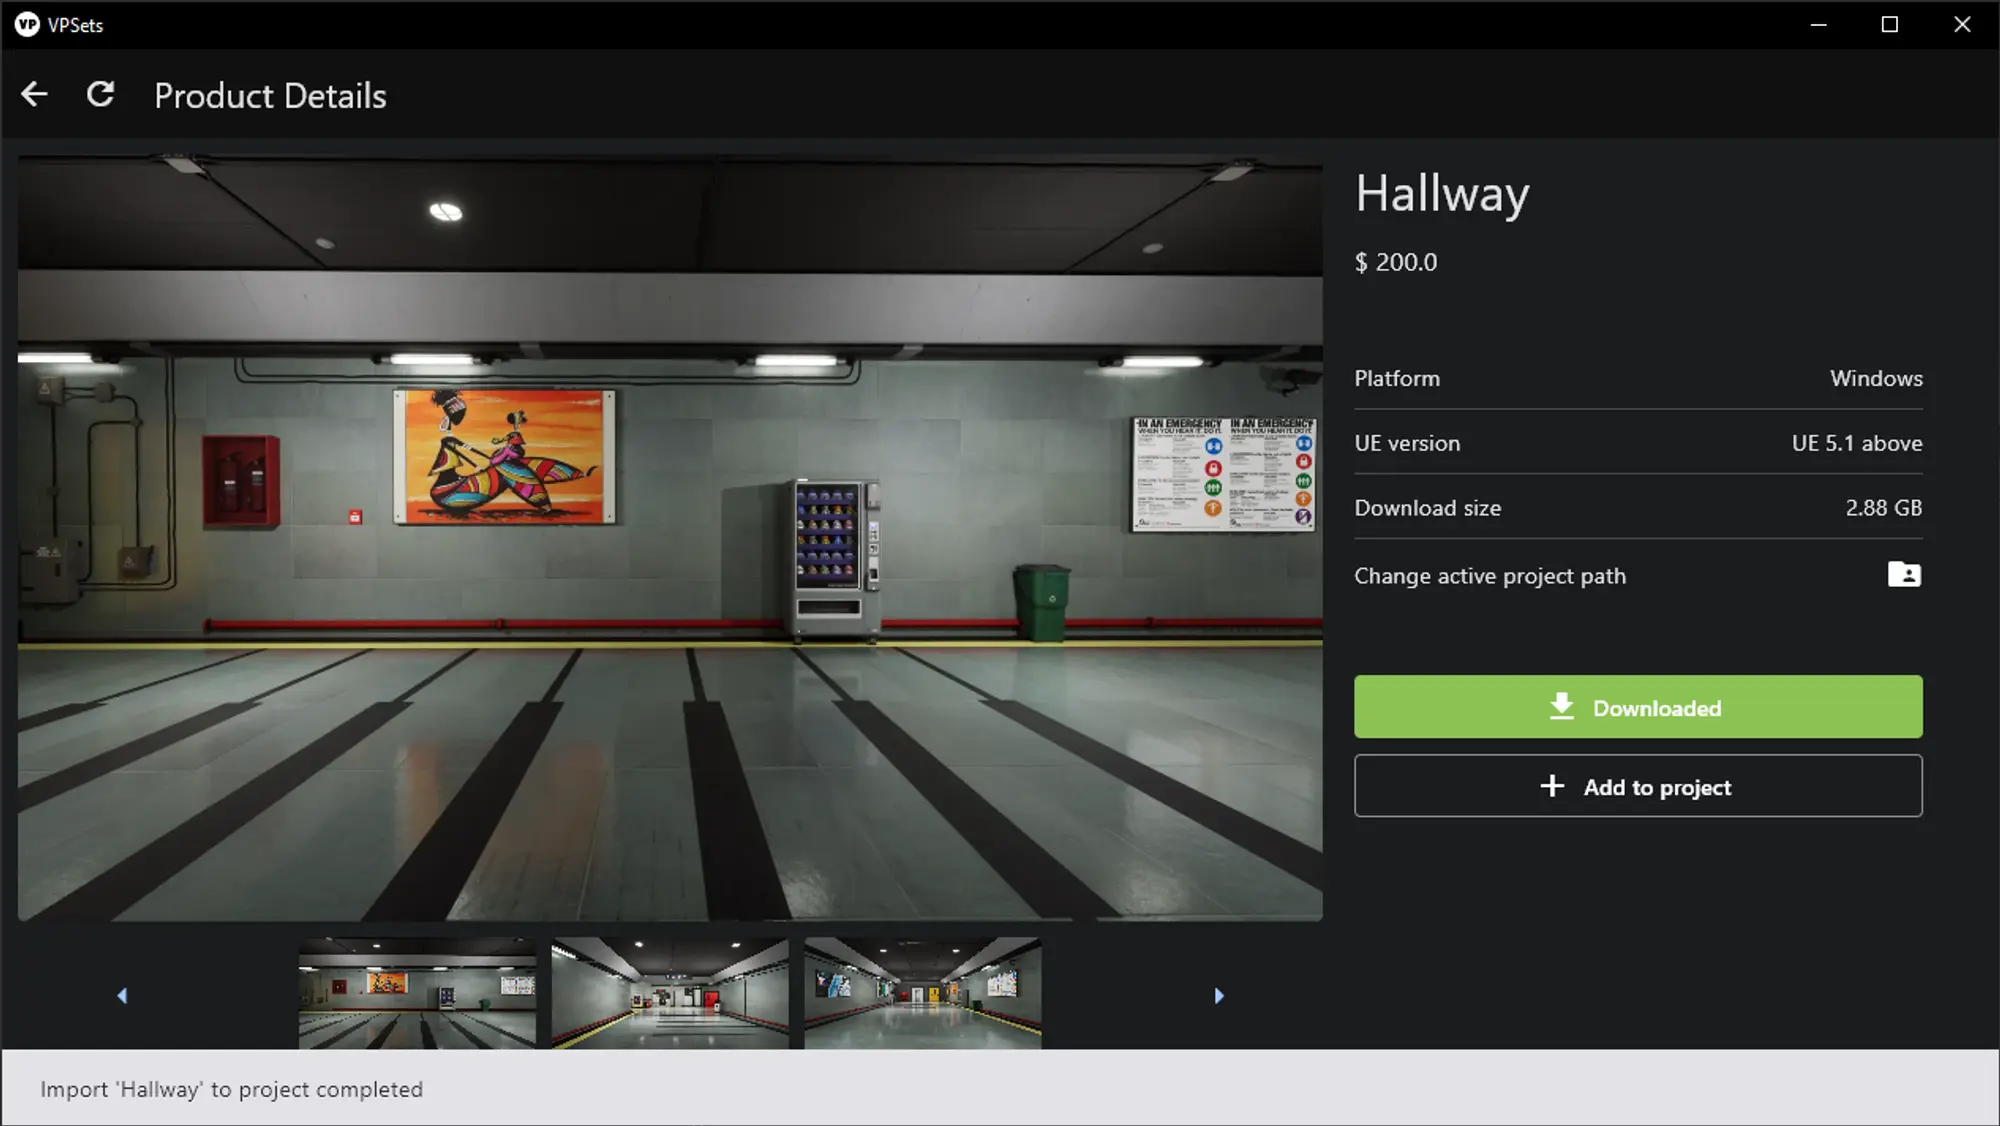
Click the "Download" button if the file is not already downloaded. A yellow download button indicates the file has not been downloaded yet, while a green button indicates the file is already downloaded.
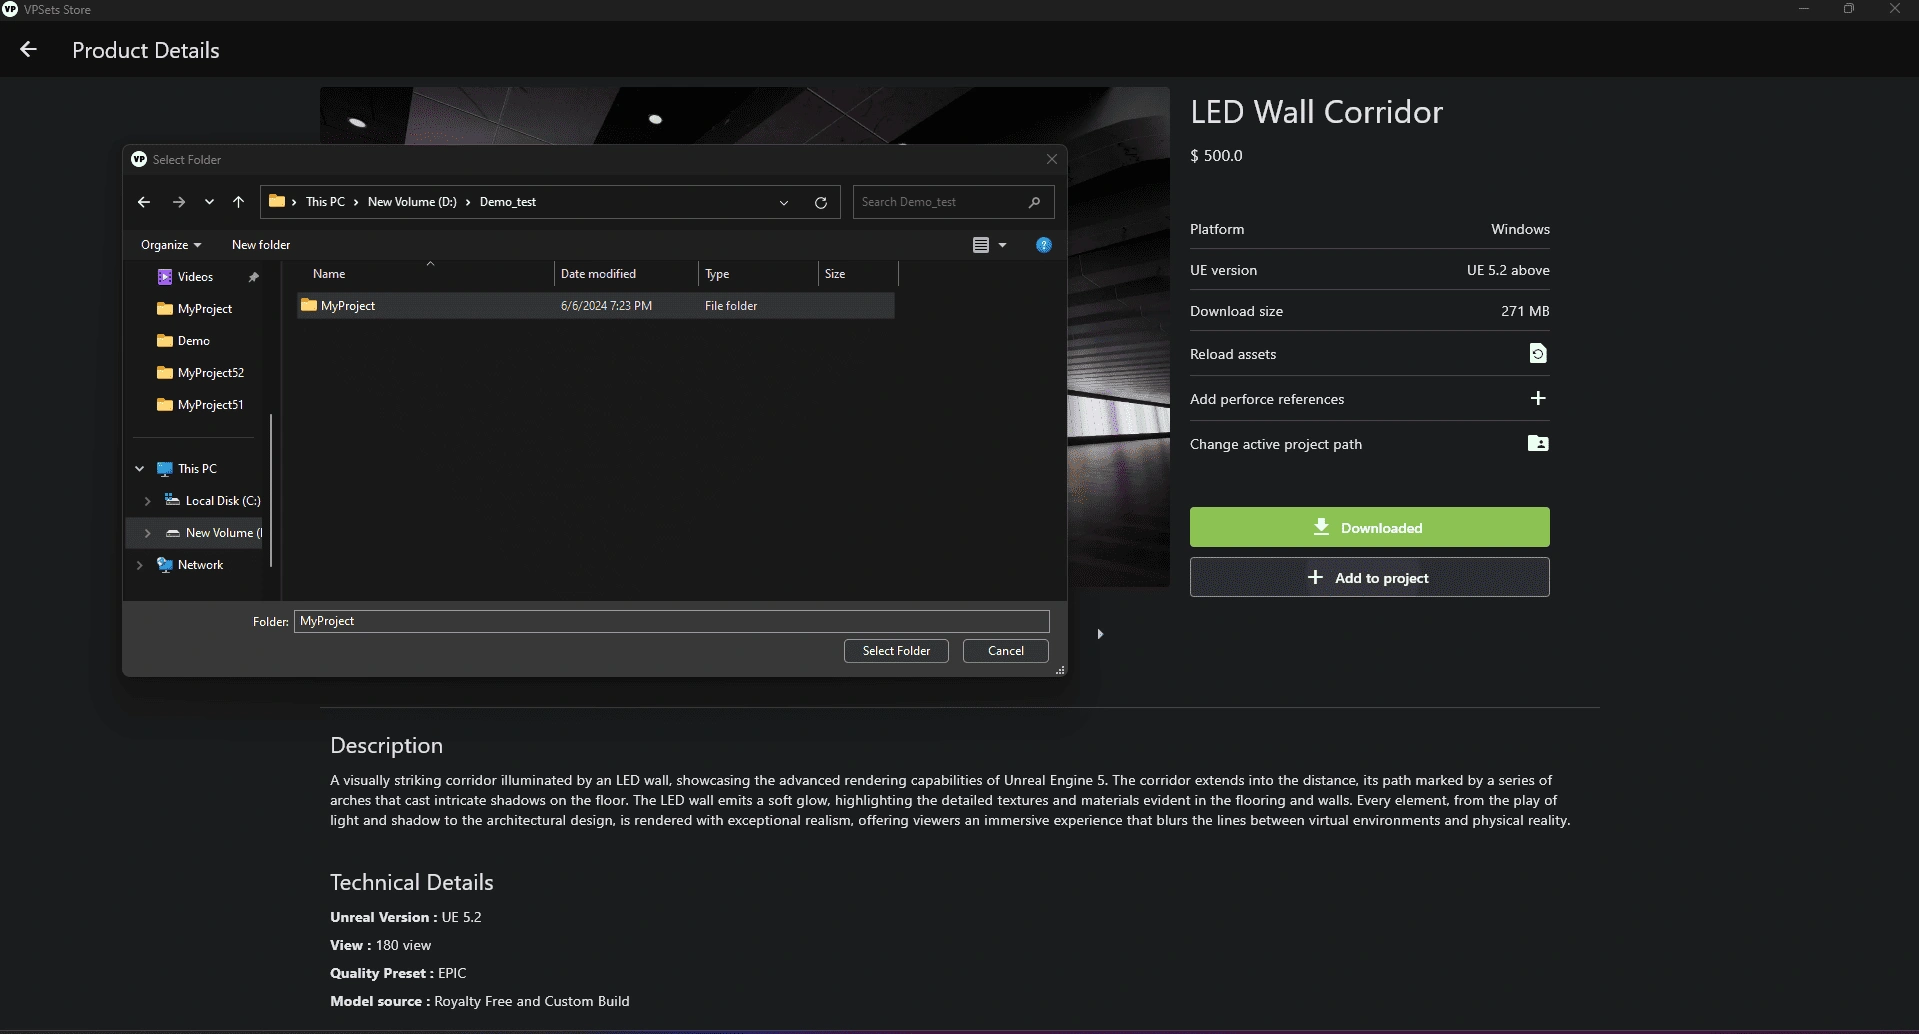
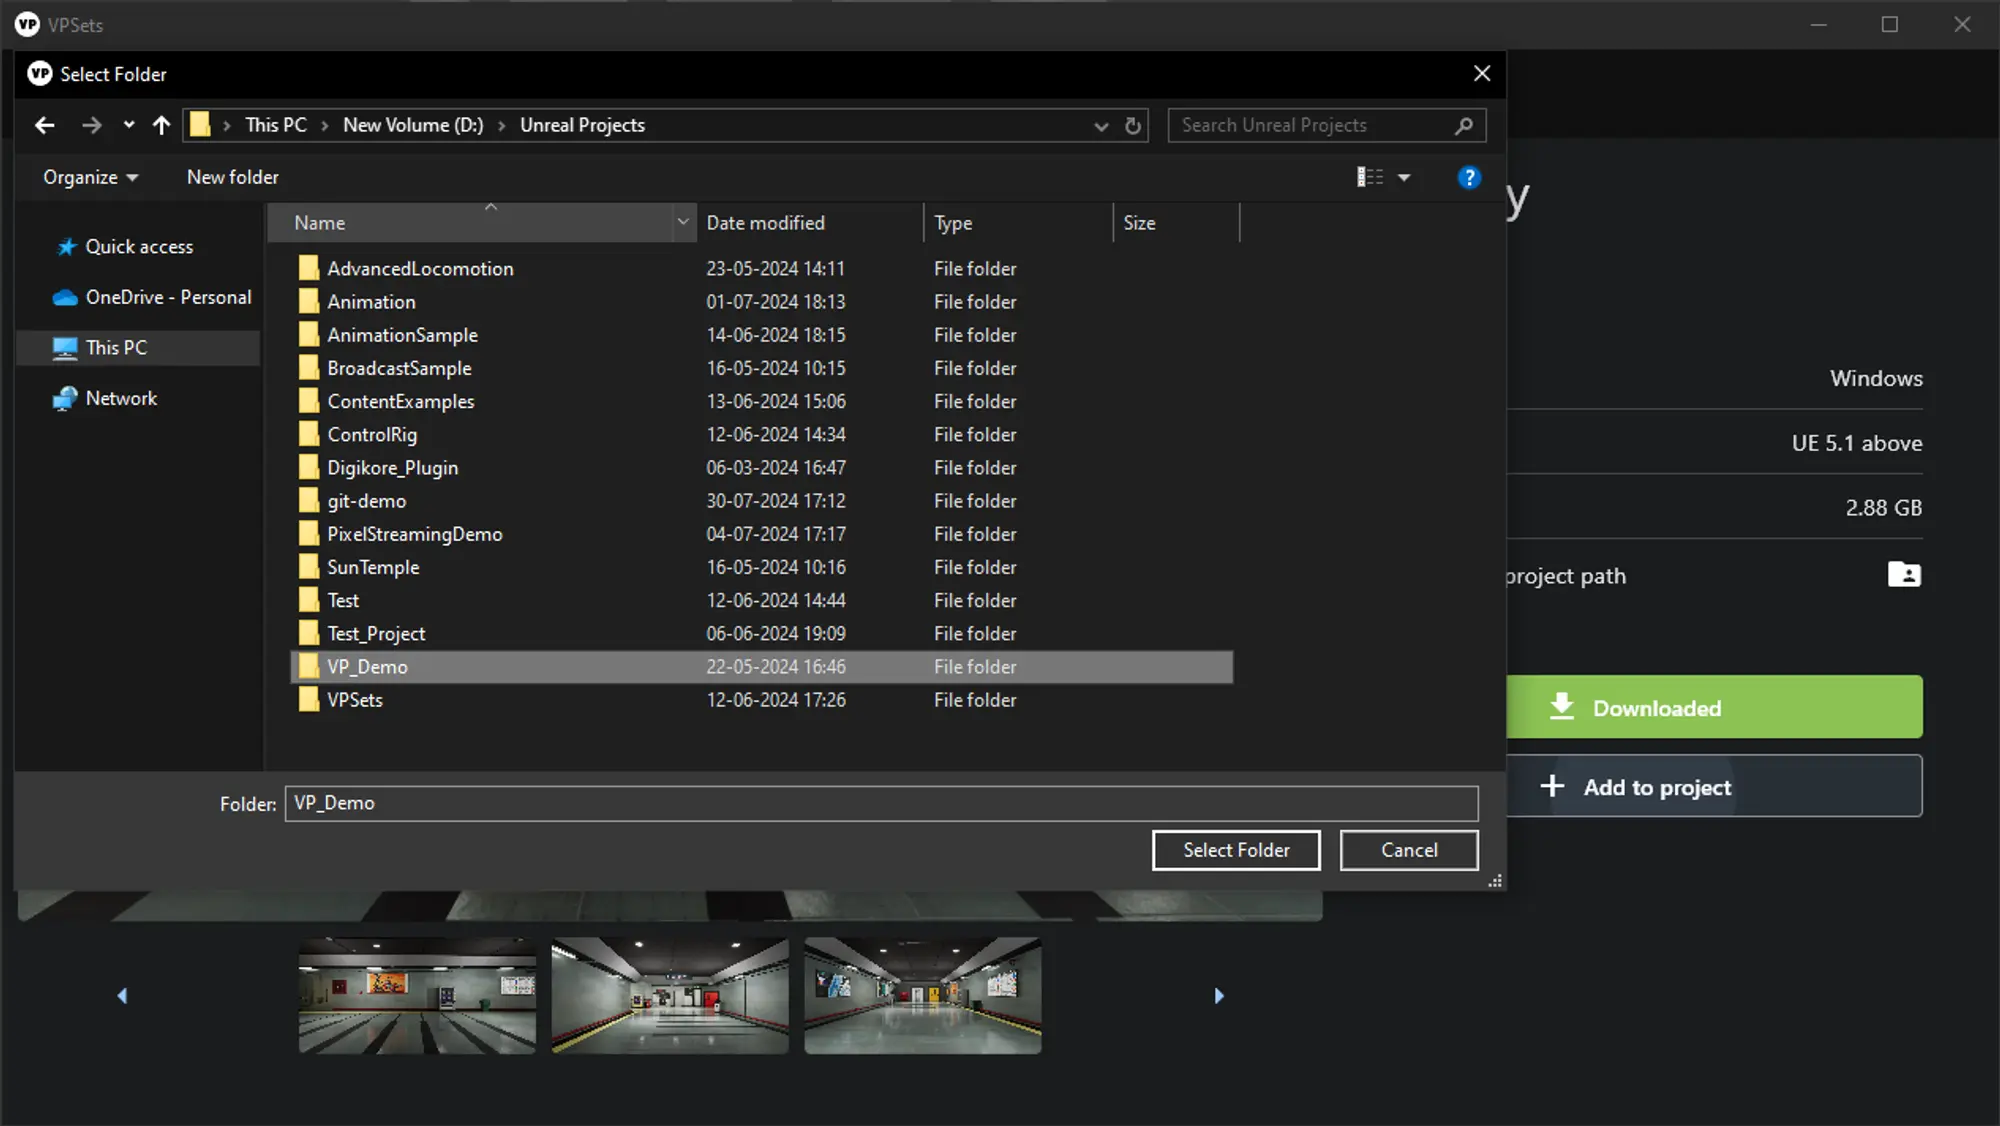
If the asset is already downloaded, click the "Add to Project" button.
A popup will appear asking for the destination folder.
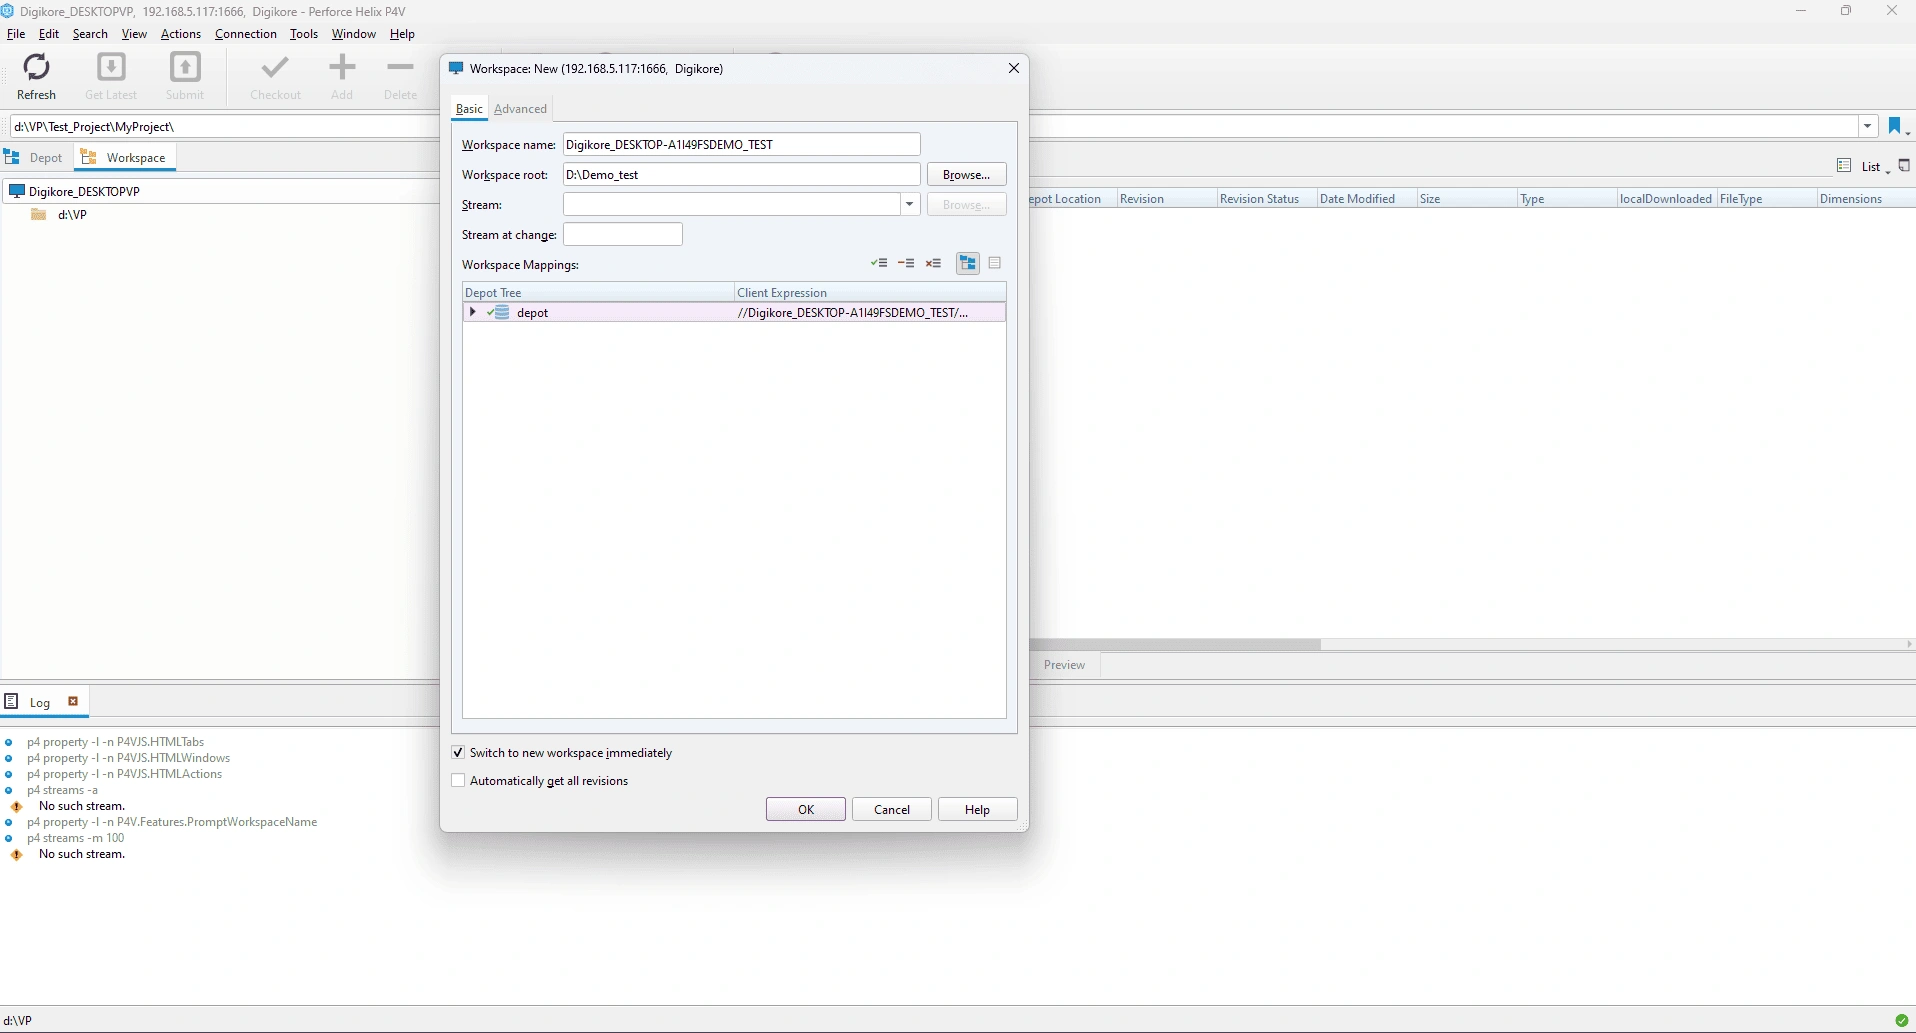
Select the appropriate folder (target project root directory containing the .uproject file) and confirm the addition of the asset to your project.
Go to the "Projects" section in the desktop application and launch the project from there, or you can open the project using the default methods in Unreal Engine.
Refer to the screenshots below for a visual guide to each step.


Troubleshooting Common Issues:
Fix Missing Plugins and Project Settings:
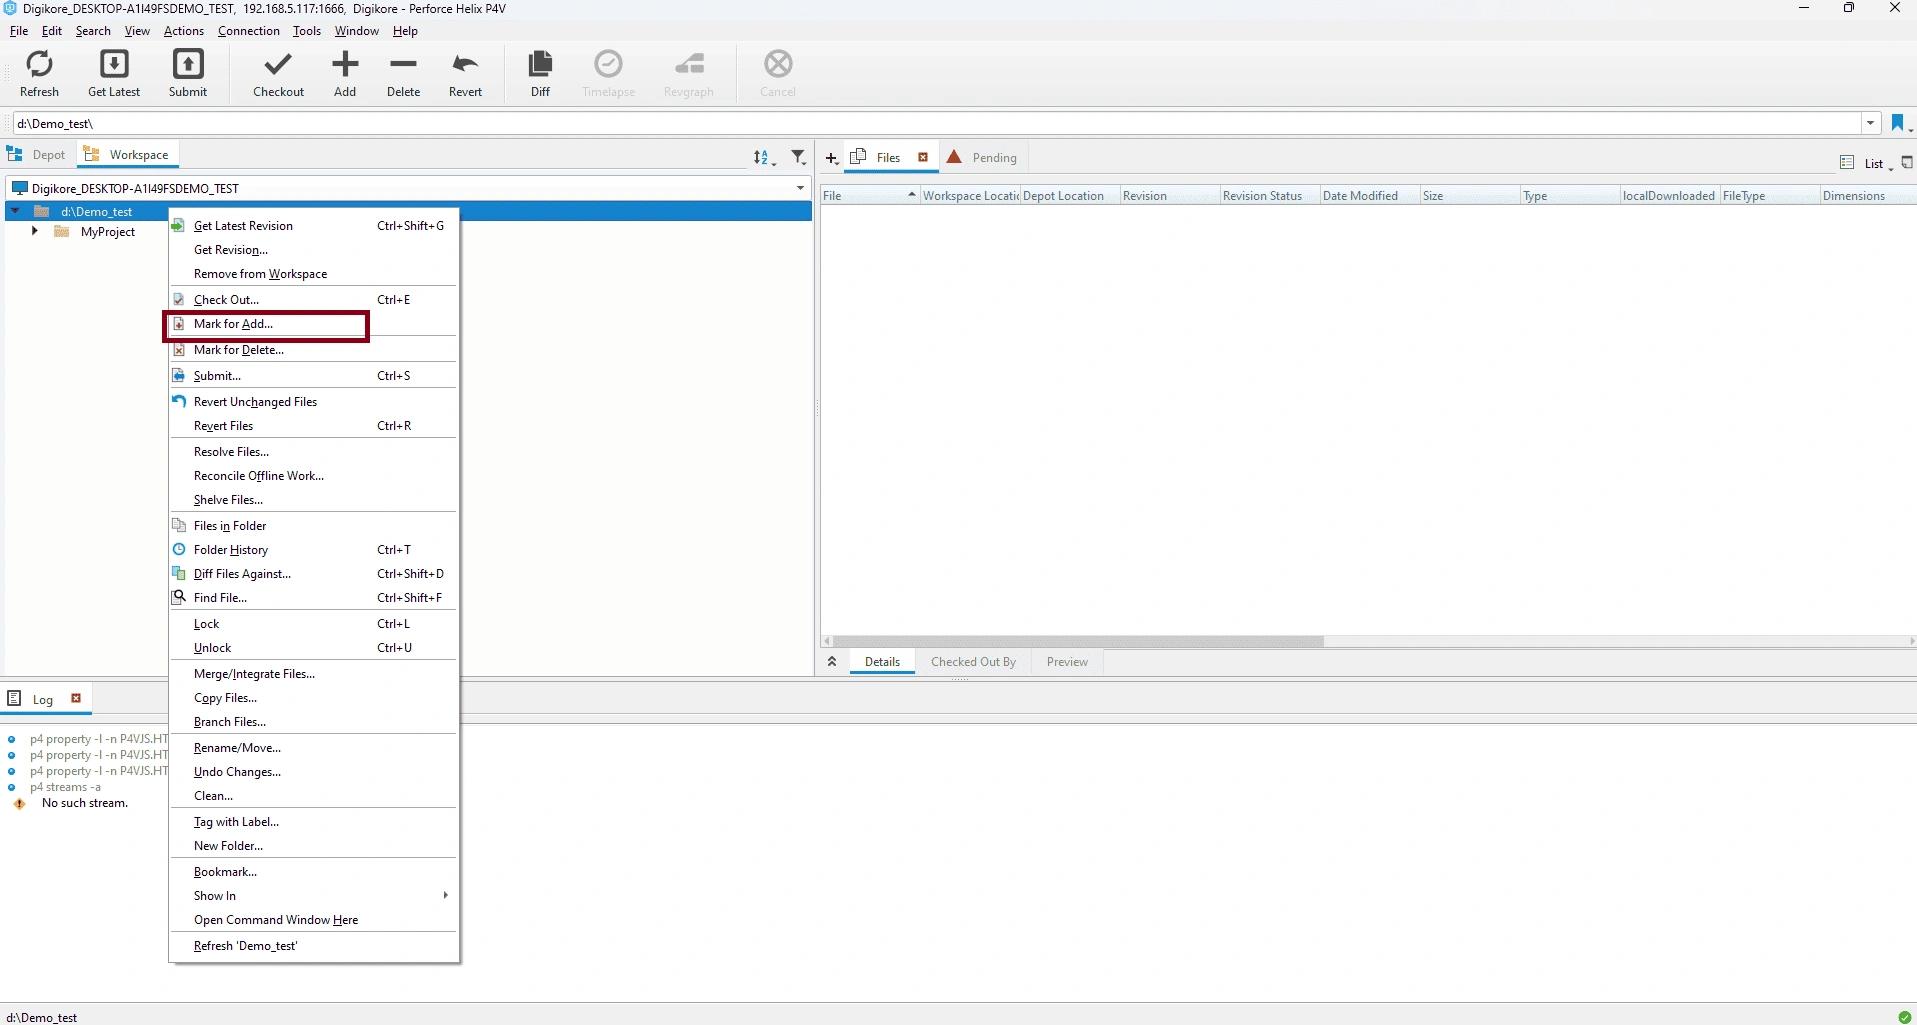
Go to the directory where your project's assets are stored.
Look for blueprints named plugin and/or project_settings (the exact names may vary).
Click on the blueprints.
If a plugin or project setting is missing, a popup will appear.
Click Enable Missing.
A restart popup will appear.
Click Restart.
After restarting, all missing settings will be added.

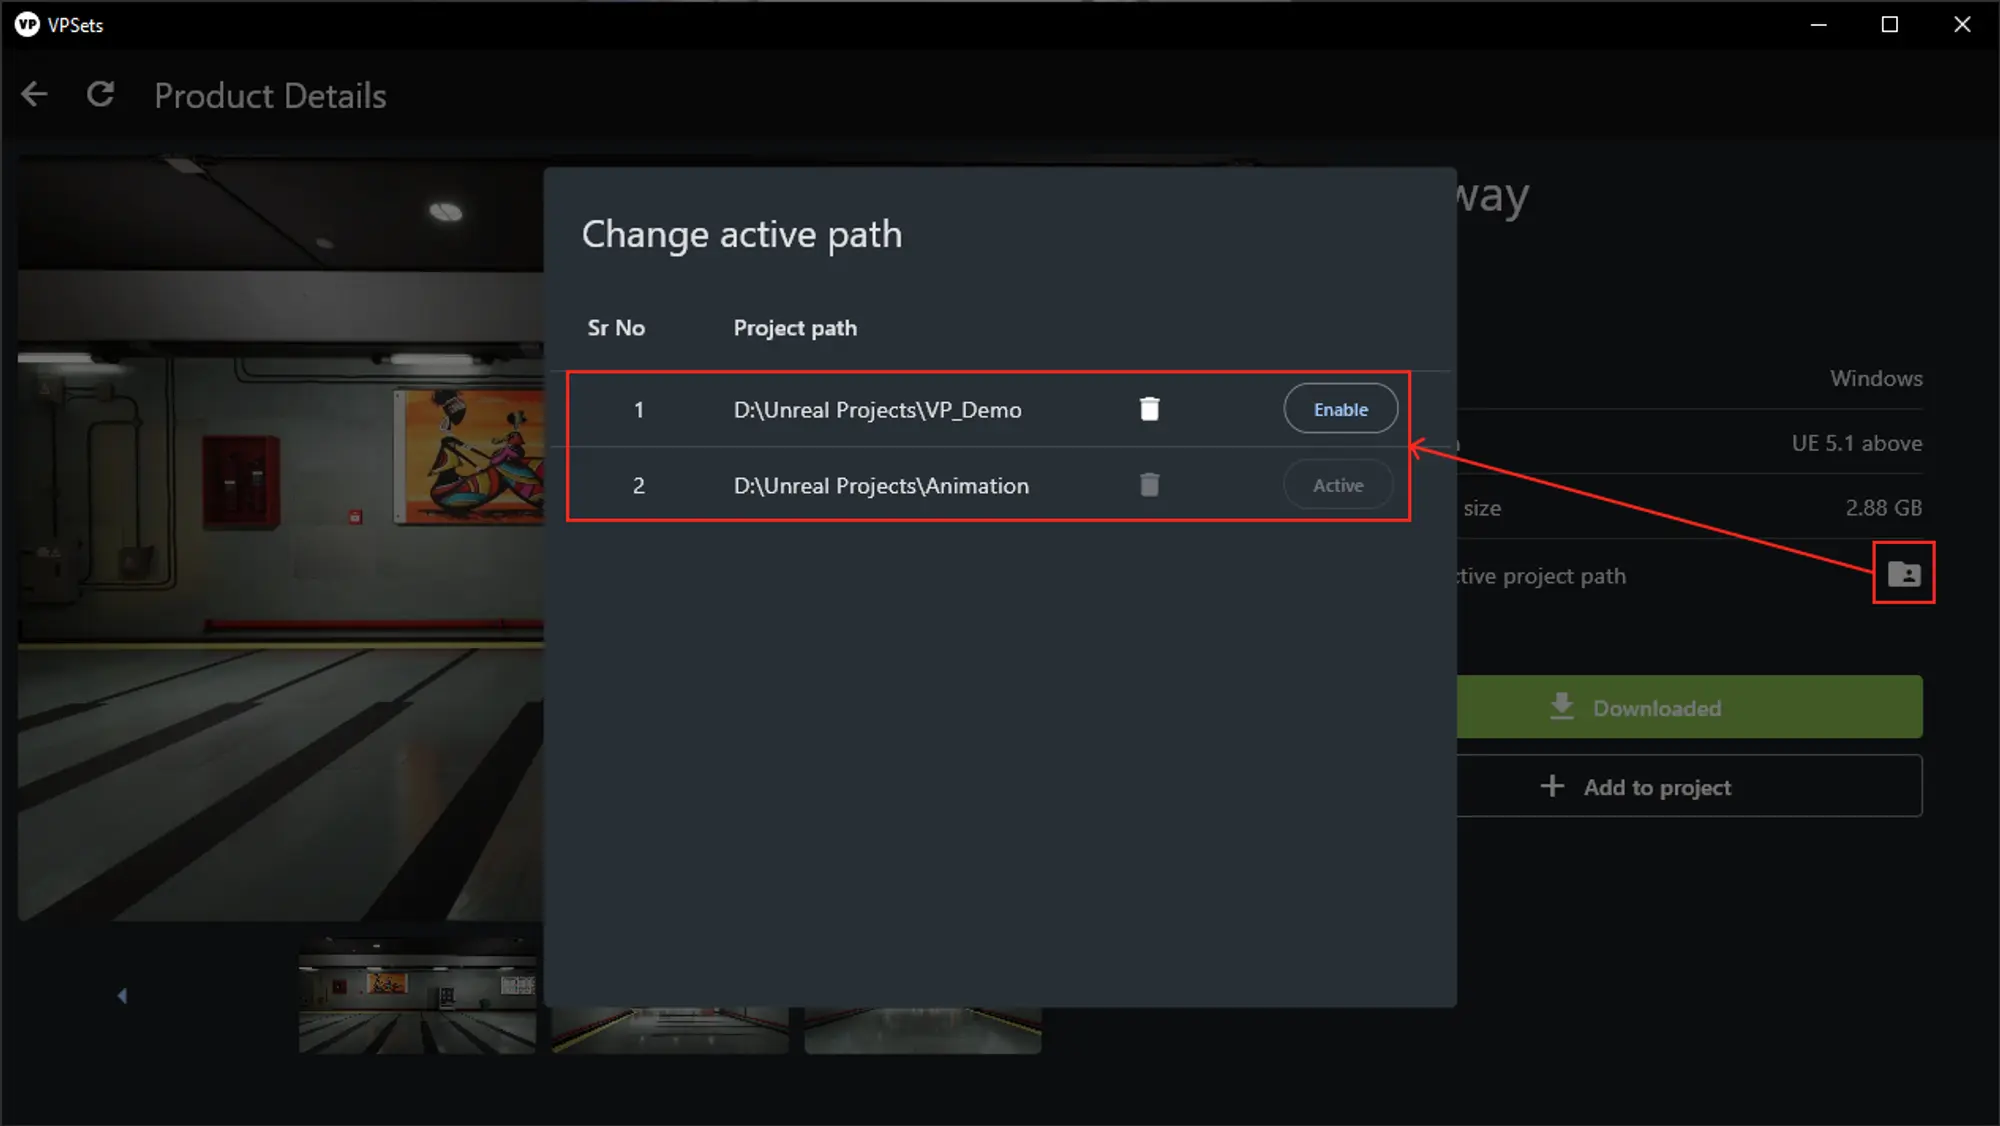
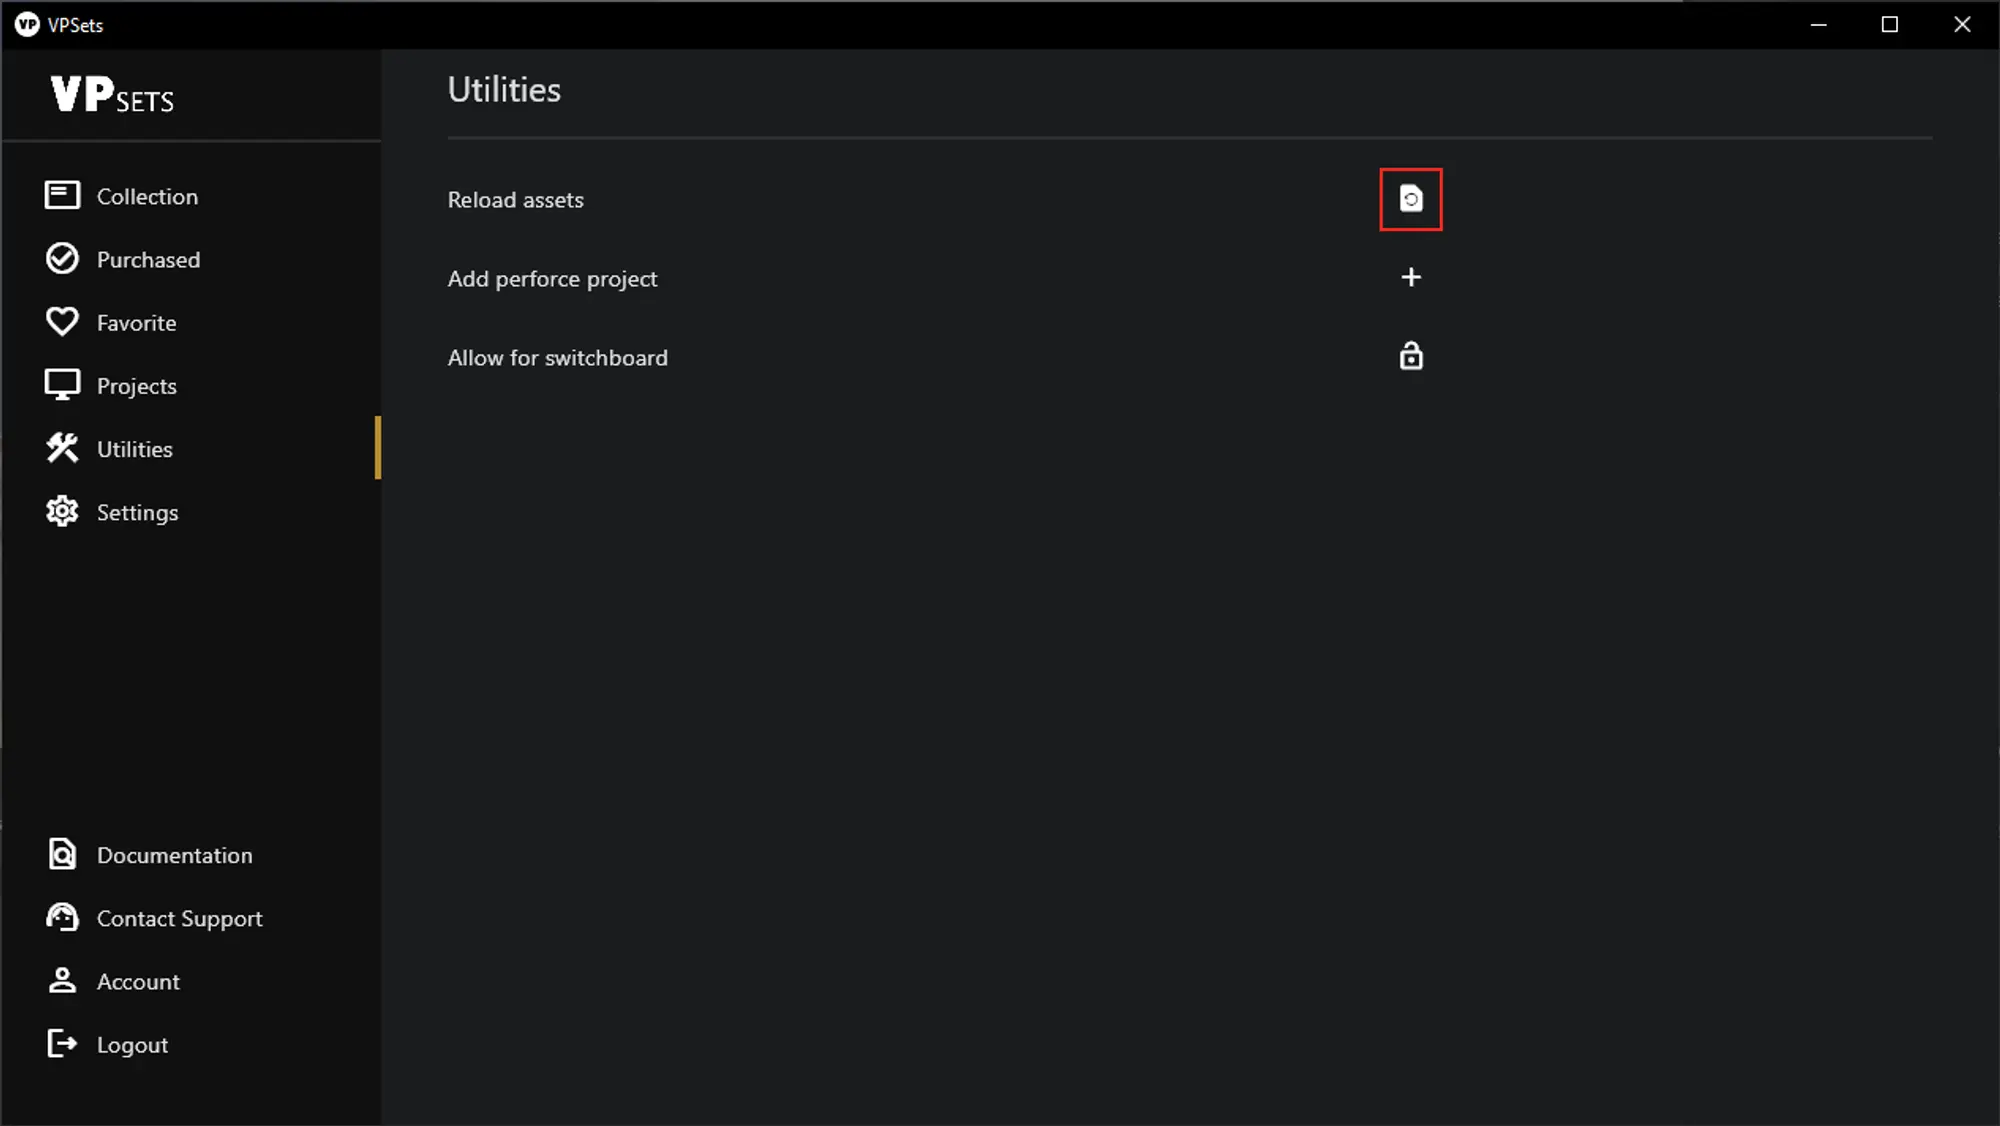
If assets are not shown upon opening your project, please follow the troubleshooting steps below:
Navigate to the "Utilities" section in the desktop application.
Click the "Reload Assets" button.
Wait for some time as this process may take a while.
If assets are still not shown, go to the specific asset page from the "Collection" or "Purchased" section.
Click on "Change Active Path.”
A popup will display the asset history.
Check if the project you are opening is listed here and ensure its status is active.
If the status is not active, click on "Enable."
Try reloading the assets again from the "Utilities" section.
If you encounter any issues or need further assistance, please contact support.
Refer to the screenshots below for a visual guide to each step.
Necessary Instructions:
Ensure the desktop application is running in the background, as this is necessary to modify or use the downloaded asset according to your requirements.
You can make changes to the assets only within the rental time duration; once the rental duration expires, you will no longer be able to use or modify the asset.
After making changes, save your modifications within the file to retain your work.